Thursday, November 29, 2012

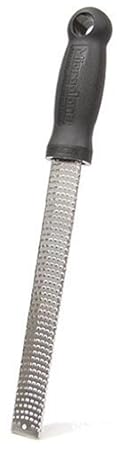
Product review: Microplane zesters

If you don't have one already, a Microplane zester is an absolute must in your kitchen.  The fine teeth enable you to take only the sweet and tangy outer layer of zest off a citrus fruit, leaving the bitter pith behind.  If grating ginger, the zester will hold onto the majority of the stringy fibres and leave you with a fine mince you would have to slave for with a knife.  Minced garlic, a snap.   Nutmeg and even cinnamon can be grated super-fine and since you are using the whole spice, the freshness of flavour far surpasses any pre-ground product.  A favorite with a lot of people is the job a Microplane does on Parmesan cheese - ultra light and fluffy, there simply isn't a better way to top off your pasta or Caesar salads.

There are some choices in design, which ultimately will come down to preference.  Some are more attractive than others, and you can choose a couple different lengths or widths.  The grating surface is the same in each case, so you can pick the one that suits you best, but I'll share a few observations I've noticed in my experience with the tools.  As for widths, the wide ones will help if grating cheese, but for citrus zest, garlic or ginger, the narrow ones are just fine.  Citrus fruits are round remember, and only a small amount of surface will be in contact with the grater anyway.  I find that the narrow ones fit better into drawers and tool kits, so I tend to stick with that style.  With regards to length, I used a full length one happily for years with no issue, but have seen over-zealous cooks bend them on several occasions, and once they've been bent, the metal is weaker at the folding point and the grater's days are numbered.  My full length grater eventually got nicked by someone, so when I replace it, I went with the shorter model with a handle.  Not that it was ever really any discomfort, but I basically never used the top part of the grater anyway except for holding, so why not get a proper handle and the shorter grating length will be inherently more resistant to pressure.  I still have it years later and it still works like a charm.  Perhaps the important thing to notice was that after my first microplane got stolen,  there was no question that it needed to be replaced - my set of tools is incomplete without it.  So is yours.  CHECK IT OUT HERE.

Tuesday, November 27, 2012

Recipe: Jamaican patty filling

To continue with the Jamaican patties, Dan and I wanted to keep one of the three varieties we made as close to "traditional" as possible.  That said, my favorite comment I had come across in doing some research was that as long as the filling was tasty, how you got there didn't matter.  Amen.  

Now I can't exactly say this recipe is 100% mine, but I can't say it's 100% anybody else's either.  It is 100% what we made however, and definitely stands as the way I'll do it in the future.  When I research a recipe, I generally scan a wide variety of recipes I have on hand or I come across on line and keep my eye out for the ones that seem most in line with what I'm making.  I then take what I like best about what I came across and put them all into one "super recipe".  In this case I wanted to achieve as complex a flavour profile as possible while staying in the parameters of the "traditional" Jamaican patty.  I have to give a shout out to Emeril, his recipe was one of the only ones that used rum in the mix - an obvious appeal there - and his spice mix went beyond "add X amount of curry blend".  Of course, once armed with our super-recipe and in the heat of the moment, there were adjustments, but the result was stellar.  Here's what we ended up with.  

With reference to size, I've doubled the recipe in order to fit the recipe for the pastry I gave you.  What Dan and I made would only have filled 3 of our extra large patties, so this one will give you six.  Within reason, the size of the patties won't really matter since roughly half the pastry goes on top and the other goes under the meat.

You will need:

907g / 2lbs                       lean ground beef
2                                       large onions - small dice
907g / 2lbs                       tomatoes - small dice
12 cloves                          garlic - minced
2 knuckles                        fresh grated ginger (2 generous tablespoons microplaned)
10 - 12 slices                    pickled banana peppers - minced
6                                       scallions - sliced
60ml / 1/4C                      parsley - chopped
4 sprigs                             thyme - chopped
5ml / 1tsp                         ground anatto (achiote)
20ml / 4tsp                       cumin
5ml / 1tsp                         allspice
5ml / 1tsp                         cardamom
15ml / 1Tbs                      black pepper (feel free to use more if you like it like me)
to taste                              kosher salt
60ml / 1/4C                      dark rum
500ml / 2C                       beef stock


Method:

 - in a large fry pan, brown the ground beef and season lightly
 - remove the beef, saving the fat in the pan
 - fry the onion in the fat until lightly golden, then add the garlic and ginger and cook a few minutes
 - add in the anatto, cumin, allspice, cardamom and black pepper and cook some more
 - add the tomatoes and banana peppers
 - add the beef back in along with the beef stock and thyme
 - let the mixture cook and the liquid come down
 - when the liquid is almost reduced out, add the rum and season with salt
 - when the liquid is basically gone, turn off the heat
 - mix in the scallions and parsley and set aside to cool
 - use as needed in the patties

Saturday, November 24, 2012

Recipe: Jamaican patty pastry

mix the spices and flour
As promised, here's the recipe I used to make the Jamaican patty pastry for our little trip to the Caribbean.  I think this is the most important part about the patties since it has such an important role in what sets this food apart from others.  In so many cases with other types of meat pies, the pastry is often quite neutral - as long as it's flaky, it's acceptable.  With Jamaican patties, there's so much flavour in the pastry itself, it has its own identity within the form.  Indeed, the colour it pretty tell-tale - as I was rolling these out, people instantly knew what I was making.  Not to take away the importance of the filling, but that tends to be the sort of thing that everyone has their style - maybe even handed down from a grandmother.  Dan and I experimented with three different fillings and while one was "traditional", all were indisputably Jamaican patties.  Why?  The pastry was proper.  This recipe made us 6 big patties, but could be stretched to as many as 8 -10 smaller ones.
rub in the butter


You will need:

300g / 10.6oz (2C)         all purpose flour (plus more for working the dough)
175g / 6.2oz (3/4C)        unsalted butter (cold and cubed)
5ml / 1tsp                        curry powder
5ml / 1tsp                       ground anatto seed (achiote)
5ml / 1tsp                       ground black pepper
2.5ml / 1/2tsp                 tumeric
to taste                            kosher salt (about 5ml / 1tsp)
work the pastry
125ml / 1/2C                  ice water
as needed                       egg wash


Method

 - cube the butter and keep it cold
 - mix all the flour, spices and salt
 - add the butter to the flour and use your fingertips to break up the butter
 - when you start to get a pea-sized crumb, add the ice water
 - mix until the dough is just shy of coming together
 - turn the dough out on a floured surface
roll thin
 - use the heel of your hand with a twisting press to mash the butter bits into the four 
 - when the dough has come together, divide into portions (ours were 100g each)
 - use your hands to form disks with the dough and wrap with plastic 
 - let the dough rest (I left mine overnight, but a 1/2 hour will be fine)
 - on a floured surface again, roll the disks out thin
 - transfer to a paper lined tray
 - place your filling on half the patty and egg wash the edge
 - fold the dough over and crimp the edge with a fork
 - cut a few vents in the top
 - heat the oven to 375F / 191C if you have convection, or 400F / 204C in a still oven
 - cook about 15 minutes, rotating if necessary
ready for the oven
 - let cool slightly
 - enjoy!


ready for my belly!


Update: Rompope

rompope topped off with egg nog espuma
A few weeks ago I made the Rompope.  The recommendation was to let it age three weeks in the fridge, so I did.  After looking at it every day, it was finally ripe to try it out.  It was pretty tasty when it was first made, but the time has let all the flavours come together and smooth out.  It is a liqueur, so it's still pretty boozy, but very smooth and perfect for holiday sipping.  Carla even commented that now we don't need to bring bottles back from Mexico anymore since we can do such a good job ourselves.  Next will come flavour variations.  

I did have some egg nog espuma handy, so I had to try the cocktail idea I had mentioned in that recipe - dynamite!  Egg nog and rompope are such close cousins, that it's almost a misnomer to say they complement each other.  Visually, there's a clear division of the thick and rich rompope and the fluffy bubbles of the espuma.  As for the taste, you get the light and airy egg nog first, then get down to the main event at the bottom of the glass.  Garnished with a little grated nutmeg, it's a perfect holiday drink.

Friday, November 23, 2012

Jamaican patties!

The latest foray with the Ultimate Burger Series took a little bit of a sidestep.  We wanted to go Caribbean, specifically Jamaican.  Try as we might to conceive of a Jamaican burger, it all seemed inferior to trying our hands at the classic Jamaican patty.  Since the Burger Series is a fun project and Dan and I agreed at the beginning to be flexible with our definition of "burger", we went with the plan.  

ready to fold and bake
In the spirit of burgers, we had to up the size a bit, and in the spirit of fun, we had to try a few variations.  The dough we made (the recipe will follow) provided for a six big patties, so we decided two would be the traditional ground beef filling (that recipe will follow too), two got a 48 hour short rib filling with corn and a mango and pineapple salsa, and two were filled with grilled cajun chicken and feta.

All three were delicious, and the variations all came across as appropriate to the style.  If one topped out, it might be the short rib if, only on the surprise factor.  It just melted in your mouth and the salsa perfectly cut through the richness.  "Oh my god, this is insanely good" pretty much summed it up.


Sidestep or not, I think we did Jamaica justice (for a couple white guys).  Watch for the recipes.


traditional, 48 hour short rib, and cajun chicken


Recipe: Rum and egg nog espuma (foam)

a very light egg nog
This is a nice twist on serving a rum and egg nog.  I used it as an element on a dessert plate recently, just as a small taste of the Christmas season coming and not wanting to jump in too strong.  I didn't go too heavy with the gelatin on this, I wanted the foam to hold some air and give the option of using a spoon, but also wanted to keep it light and even drinkable like an airy milkshake.  I really liked the visual effect of how once out of the iSi gun, the bubbles expanded slightly, then the gelatin held its ground.  This could be served as I did as an element on a dessert (you can up the gelatin if you want it stronger) or it could be served on its own as a light welcome cocktail at a holiday party.  It would be a perfect top off garnish if you made the rompope recipe and were serving it to guests.  I even made an egg nog cappuccino, but you don't want to wait too long since the heat of the coffee will work against the gelatin in the foam.  This recipe is suited for a single load in a standard iSi canister.
soak the gelatin


You will need:

750ml / 3C          egg nog
80ml / 1/3C         dark or spiced rum
3 sheets               gelatin


melt the gelatin with rum


Method:

 - soak the gelatin, then drain
 - gently warm up the egg nog in the microwave (just so the gelatin doesn't seize) 
 - heat the rum up in the microwave to fairly hot
 - melt the gelatin into the rum
 - mix the rum and the egg nog
 - load into the iSi gun
 - screw the top on and give it two NO2 charges, shaking well after each one
 - chill completely - at least a few hours or even overnight
mix with egg nog
 - shake well and serve


egg nog cappuccino!
charge and chill


Saturday, November 17, 2012

Recipe: Peeled tomatoes

Most people know the basic way to peel a tomato - blanch the tomatoes in boiling water for 30 seconds, then transfer to ice water, then peel.  It works, no doubt, but somewhere along the line, somebody took the time to really think about the process and what you are trying to achieve, and adjusted the technique accordingly.  

 In the industry, we go through a lot of tomato concasse - basically skinless dice tomatoes.   Ideally, it's a raw product, and by adjusting the way we do it, means that the flesh of the tomato doesn't even get that 30 seconds of cooking from the usual way.  The two biggest changes are to ice the tomatoes first, then break that 30 seconds down to 3 or 4 stages.  Incidentally, if you are going to stew the tomatoes anyway, you can keep blanching tomatoes as normal, this method is trying to keep them as raw as possible.

You will need:

tomatoes
a large pot of boiling water (you don't want the boiling to stop as you add the tomatoes)
two ice baths (lots of ice)

Method:

 - as normal, score the bottom of the tomatoes with an "X"
 - plunge the tomatoes in the first ice bath for five minutes
 - get the water really boiling
 - drop the tomatoes into the boiling water, but stop adding if the boiling slows down
 - after 5 -10 seconds, pull the tomatoes out and plunge into the second ice bath
 - repeat with the tomatoes that were left behind
 - switch positions of the ice baths
 - repeat the blanching 3 or 4 times, but the tomatoes won't need more than a total of 30 seconds cooking
 - after the last blanch, leave the tomatoes in the ice bath a few minutes - this will help loosen the skin
 - peel the tomatoes as normal

Friday, November 16, 2012

Recipe: Turkey jus

I love a good gravy, but if you want to elevate a holiday meal a bit you may want to try serving a delicious and refined turkey jus instead.  The major difference between a jus and a gravy is that a jus is not thickened with a roux, rather is is thickened through the reduction and concentration of a stock.  A jus will be a bit thinner than a gravy, but very rich.  If it is a concern for you, it is also nearly fat free and quite nutritious for you as you've taken a large amount of stock with all its nutrients and removed a significant portion of water. 

This recipe is an extension of the recipe for turkey stock in the previous post, so you can even start to prepare the wine reduction simultaneously as the stock is cooking.  Keep in mind that it is easier to take the fat out of a stock when it is cold, but it can still be done when warm with some careful ladling.  You don't need to start with a chilled product at this stage so if you need, you can go straight from straining the stock to the reduction of the stock to a sauce.  It's not an exact science or anything, so how far you take it down is up to you - you can have it thin like an au jus, or bring it right down to a syrupy consistency.  Depending how much sauce you need for the meal, it wouldn't hurt to have a bit of good chicken stock on hand to help stretch the final product if you intend to reduce the sauce quite a bit.  It's not really going to dilute the product too much as they are both birds and the flavour of the turkey stock will naturally override the chicken flavour.

How much do you reduce the stock?  Remember that you will serve it warm, so you can monitor the consistency as you go.  A good test is to spoon a little on a plate and watch how it behaves.  It should not run like water, but be able to hold itself in a clean little pool - it should also have left a nice even film on the spoon.

In the end, the quality of the jus will largely depend on two factors.  The first being the care taken in making the initial stock, and during the reduction process - wash your mirepoix, take care in skimming it, and never boil it - just let it gently simmer away.  The other factor is the level of refinement in the straining process.  Strain the initial stock well, but when straining the finished jus, go the extra mile.  You can start by straining through a rough mesh seive to take out the vegetables, but then you want to move on to a fine chinois, then to a cheesecloth lined chinois and even repeat that stage - you'll be surprised how much fine sediment keeps coming out, but in the end, your sauce will shine and be as smooth as glass.  

Final note, although I put a touch of salt in the initial stock to help the clarity, save all the seasoning to the very end.  In the reduction process, water is evaporated out, salt is not, and if you added it too early, your only option is to dilute the sauce to even things out.

You will need:

3                 onions
454g / 1lb   button mushrooms
2                 shallots
1L / 1qt      white wine
as needed   vegetable oil

Method:

 - julienne the onions and shallots
 - wash the mushrooms well and slice thin
 - with the smallest amount of oil possible, sweat off the onions and shallots (use a non-stick pan even)
 - add the mushrooms and sweat down
 - after the mushrooms have released their water and it has reduced out, add the wine
 - let the mixture simmer (not boil) and reduce until there is only a small amount of liquid left
 - add the mixture to your stock
 - simmer and reduce the stock to a jus - the thickness is up to you
 - strain well, really well
 - season
 - serve, or cool down and store in the fridge

Recipe: Roasted turkey stock

As you move through turkeys during the season, you should take the opportunity to make stock. Even if you have the carcass after roasting and eating the bird, there's still lots of flavour to be had in the bones.  Certainly, if you have decided to prepare the turkey off the bone, you won't want to waste the bones - you still need a sauce or gravy, and you won't have the roasting pan the day of the meal to get your juices.  

This recipe is a "brown" stock in that the bones and mirepoix have been roasted.  This will give you some much needed roasted flavour and colour for your sauce.  Of course you can keep this a "white" stock if you choose and not roast the bones and mirepoix (you'll want to leave out the carrot as well). 

Committed to a traditional gravy?  No problem, I love it too.  You'll notice I mentioned to keep the fat cap on the stock.  This not only ensures that you get every last drop the stock you made, you can use the fat cap to make gravy the normal way - make your roux, add the juice (stock), season and you're done.  You can even keep a stash of fat and stock in the freezer just in case at a later date you need to make poutine - you'll be a hero.

You will need:

4.5kg / 10lbs   turkey bones (any skin is good too)
3                      onions
4 stalks            celery
1                      carrot
1 bulb              fennel
4 cloves           garlic
pinch               kosher salt  

sachet:             tarragon
                        thyme
                        sage
                        bay leaf
                        black peppercorns

Method:

 - set the oven to 375F / 190C
 - set the turkey bones and skin on a tray and roast until golden brown
 - chop the mirepoix
 - set the mirepoix on the tray the bones were roasted in and toss around in the fat
 - roast the mirepoix to get a bit of colour
 - place the roasted bones and skin in a stock pot and cover with cold water
 - bring up to a gentle simmer
 - skim any impurities from the surface
 - when the impurities aren't surfacing much anymore, add the mirepoix and a pinch of salt
 - prepare the sachet and add to the stock
 - gently simmer 6 - 8 hours, skimming impurities when needed
 - turn off the heat
 - strain the stock through a cheesecloth lined seive (don't worry about fat getting through)
 - cool completely in an ice bath, then move to the fridge
 - once cold, you can remove the fat cap and use it if making gravy
 - use the stock as needed

Wednesday, November 14, 2012

Product review: Activa RM - "meat glue"

Activa RM has become a favorite in modern kitchens everywhere.  It is relatively "new" to the restaurant world, but has been used by commercial food producers for a long time.  Those deli-style turkey loafs and boneless honey hams you've eaten for years?  You bet, you've already had it.

For the sake of education, Activa is a transglutaminase, which means it is an enzyme that bonds proteins together.  It is generally produced through a special fermentation process or extracted from animal blood.  It may sound a bit scary, but on the good side, the scarier something is, the more closely the health authorities tend to scrutinize the operations.  Case in point:  people tend to be paranoid about undercooked pork, they have been for centurites, and for good reason as is a source of trichonosis.  These days, the pork industry is so closely watched that you can quite safely and confidently eat a medium rare chop if you choose - I've done it myself.

Moving past the production process, Activa opens up a world of possibilities for the modern cook.  From simple applications such as helping a terrine hold together or using it as a binder in hamburger meat to all out Dr. Frankenstein in the kitchen.  We did a holiday turduckin one year and used Activa to help hold the turkey, duck and chicken together.  I've even seen it used with a salt-crusted roast - Activa was mixed with the egg white to help create a better salt shell.

There are some good handling practices you should employ with Activa to ensure safety and the effectiveness of the Activa itself.  When using, it is easiest to apply using a salt shaker for even application, and when done, best to vacuum seal the shaker in a bag and store it in the freezer.  Whatever isn't isn't in the shaker should always be sealed and stored in the freezer.  You should wear gloves when handling the product, but don't worry, it's not like crazy glue, it's just that we are made of protein ourselves and any on your hands will be wanting to bond.  For the same reason, some chefs take the extra precaution of also wearing goggles and a surgical or drywall mask to avoid inhaling any airborne product.  As with many things, use it properly and responsibly and you will be able to accomplish things you may have never thought possible.

You will have a very hard time finding Activa in a store, but you can order it through Amazon.  There are two sizes available.

If it's your first time using it, you will want the smaller size - CHECK IT OUT HERE.

If you know you will be using it a lot, the larger size is HERE.