Showing posts with label breads. Show all posts

Sunday, June 23, 2013

Recipe: Malted souffle pancakes

I was really happy with the souffle pancakes, and was interested in making a variation.  Then I spotted the jar of Horlick's malt powder in the cupboard - perfect!  Since malt is based on wheat and barley, it lends itself to the form without stretching the imagination.  I figured why not use malt vinegar to sour the milk too?  The idea was to substitute a portion of the flour with the malt, but because Horlick's is a drink mix, I thought it might be prudent to add a bit extra to make sure the overall binding power of the dry mix was about the same.  The result was fluffy and delicious, and even tasted a bit nutritious.  It's not like having a malted milk in pancake form, rather the addition of the malted barley really deepened the overall flavour - and no, the malt vinegar didn't make them vinegary or anything like that, but it sure made the baking soda puff up!

You will need:

185ml / 3/4C                    milk
30 ml / 2Tbs                     malt vinegar
185ml / 3/4C                    flour
2                                       eggs
45ml / 3Tbs                      melted butter
125ml / 1/2C                    Horlick's malt drink mix
7.5ml / 1.5tsp                   baking powder
2.5ml / 1/2tsp                   baking soda
30ml / 2Tbs                      sugar
2.5ml / 1/2tsp                   vanilla
1.25ml / 1/4tsp                 kosher salt

Method:

 - bring all ingredients to room temperature
 - add the malt vinegar to the milk and set aside to sour
 - sift the flour, malt mix, baking powder, baking soda, and salt together
 - separate the eggs
 - melt hte butter and set aside
 - whisk the egg whites to a soft peak, sprinkle in half the sugar and bring to a medium firm peak
 - whisk the egg yolks and the rest of the sugar until pale
 - whisk in the vanilla
 - whisk in the melted butter
 - whisk in the sour milk
 - add the yolk mix to the dry and stir smooth
 - fold in the egg whites
 - fry in a hot skillet

Thursday, May 30, 2013

Recipe: Maple pumpernickel microwave cakes

The technique on these cakes is really fun, but the magic is in how incredibly tasty they are.  The fact that the flavour is pumpernickel makes it adaptable as a bread item on a savory plate, while the sheer dark and sweet deliciousness makes it work as well as a dessert.  Pair these up with smoked salmon and a cream cheese aoli one day, then macerated cherries and vanilla ice cream the next - it all works.

You will need:

160g / 5.6oz                        eggs (about 3)
80g / 2.8oz                          unsalted butter
70g / 2.5oz                          flour
50g / 1.8oz                          sugar
25g / 0.9oz                          molasses
25g / 0.9oz                          maple syrup
10g / 0.4oz                          cocoa powder
3g / 0.1oz                            ground caraway

Method:

 - put all ingredients into a bar blender and mix very well
 - strain through a chinois into an iSi gun
 - charge well - 2 for a 500ml / 2C canister, or 4 for a 1L / 1qt canister
 - shake well
 - punch a few holes in the bottom of a few 500ml / 2C plastic tubs
 - spray the mix into the tub until about the halfway mark
 - microwave for 45 seconds to a minute, depending on the power of your microwave
 - turn the tub upside down to cool and aerate (the holes allow steam to escape)
 - once cool, run a knife around the edge to loosen and remove
 - serve, or store in an airtight container for service later (these are best served the same day)

Sunday, May 26, 2013

Recipe: Souffle pancakes

sift the dry
 We were messing around with breakfast this weekend.  I managed to blend a few pancake recipes into one very nice one on Saturday.  Then I was thinking about how it might be better.  Not wanting to mess with a good formula, it seemed a good thought to take a page out of the old omelette book and souffle the pancakes - no messing with the formula, just adding a step in dealing with the eggs.  If you don't want to go the trouble, the recipe works just fine as a regular mixer - you can even get away with one egg if that's all you have, but for souffle, you definitely want that extra elevation.  As for the soured milk, some recipes also use vinegar, but more importantly, it's taking into account that you probably won't have buttermilk around the moment you are inspired to make pancakes and a trip to the store might kill it.  If you are stocked, by all means substitute the buttermilk right across with the milk - cut back the acid though as the buttermilk will have some, but keeping a little will help the baking soda go to work.  Another nice trick is to sprinkle a little brown sugar over the pancake right after you drop it in the pan so when to flip it, the sugar will caramelize and have an extra delicious crust.  Enjoy!
whip the whites


You will need:

250ml / 1C             flour
185ml / 3/4C          milk
2                             eggs
45ml / 3Tbs           melted butter
30ml / 2Tbs           lemon or lime juice
30ml / 2Tbs           sugar
7.5ml / 1.5tsp        baking powder
2.5ml / 1/2tsp        vanilla or vanilla paste
2.5ml / 1/2tsp        baking soda
1.25ml / 1/4tsp      kosher salt

mix the wet


Method:

 - have all ingredients at room temperature
 - add the lemon or lime juice to the milk and set aside to sour
 - sift the flour, baking powder, baking soda and salt together
 - separate the eggs
 - melt the butter and set aside
 - whisk the whites to a soft peak, sprinkle in half the sugar and whisk to a medium firm peak
 - add the other half of the sugar to the egg yolks and whisk pale
 - whisk in the vanilla
 - whisk in the butter
 - whisk in the soured milk
 - using the whisk, stir the wet mix into the dry mix
mix the wet and dry and fold in the whites
 - fold in the whites
 - fry in a hot skillet


Wednesday, March 20, 2013

Recipe: Hot cross buns

mix the dough
Not a lot needs to be said about hot cross buns, most people know them and most of those people probably quite like them.  Although most popular around Easter, specifically Good Friday, they've become welcome year round as a sweet bakery choice.  And that's just it, considering all the talented and adventurous cooks I know, almost all of them default to the local bakery to get them.  Shame, Shame.  I caught myself falling into this trap, then considering how much I enjoy them, figured I better get on the task.  This also led to the mixed candied peel recipe in the previous post - if I'm going to make it from scratch, I'm not going to fall back on an inferior ingredient.


You will need:
proof and round up

For the buns:

34g / 1.2oz                 yeast
75g /1/3C                   sugar
180ml / 6.1fl oz          milk
480g / 17oz                flour (plus more for bench work)
2.5ml / 1/2 tsp            salt
3                                 eggs
125ml / 1/2C             vegetable oil
1                                lemon zest (microplane)
2.5ml / 1/2tsp            cinnamon
1.25ml / 1/4tsp          clove
1.25ml / 1/4tsp          nutmeg
1.25ml / 1/4tsp          allspice
arrange the buns in the dish
80ml / 1/3C               dried currants
80ml / 1/3C               mixed peel (see mixed candied peel recipe)

For the syrup:

60ml / 1/4C              water
22.5ml / 1 1/2Tbs     sugar
2.5ml / 1/2tsp           vanilla (I used vanilla paste - same measure)

For the icing:

125ml / 1/2C           icing sugar
7.5ml / 1/2Tbs         milk

 Method:
proof again

 - boil a bit of water
 - pour it over the currants to rehydrate them a bit, then strain them off after 5 minutes
 - warm the milk up in the microwave (just above room temperature)
 - bloom the yeast in the milk with a bit of the recipe's sugar
 - crack the eggs and give them a little whisk
 - measure the spices and zest into the sugar and mix
 - add all the dough ingredients except the currants and peel to a mixer with a dough hook
 - mix on low speed until it comes together - it is a "wet" dough
 - turn up the speed on the mixer for a few minutes to develop the gluten
 - add the currants and peel and keep mixing until well distributed
 - transfer the dough to an oiled bowl and cover with plastic wrap
 - let proof until double the size
bake and glaze
 - butter a 9 x 13 baking dish
 - turn out onto a floured counter and knead slightly
 - divide the dough into 12 balls (or more if you like)
 - roll the balls and arrange evenly in the dish (4 rows of 3)
 - cover again and let proof
 - turn the oven on to 350F / 177C
 - bake the buns 25 - 30 minutes until evenly brown, rotating the pan periodically
 - combine the syrup ingredients, bring to a simmer, then set aside
 - when the buns are done, remove from the oven and cool in the pan
 - brush the buns with the syrup (2 coats was enough for me)
 - mix the sugar and milk for the icing and transfer to a piping bag (or a sandwich bag with the corner cut)
 - on the cooled buns, make the crosses
 - serve
ice the crosses


it's as soft and fluffy as it looks


Monday, March 18, 2013

Recipe: Irish soda bread

This is a good recipe for Irish soda bread.  I like its well rounded flavour from the buttermilk and coriander.  Since I like to use this bread for sopping up the juices in a stew, individual rolls are the shape of choice for me - you also get more of the delicious crust than with bigger loaves.

You will need:

1250g / 2.75lb               all purpose flour
12.5ml / 2.5tsp              kosher salt
37.5ml / 7.5tsp              baking powder
12.5ml / 2.5tsp              baking soda
156ml / 2/3C                 sugar
2.5ml / 1/2tsp                coriander
150g / 5.3oz (2/3C)      unsalted butter
3                                    eggs
780ml / 3.3C                 buttermilk
as needed                      milk

Method:

 - set the oven to 350F / 177C
 - mix the flour, salt, baking powder, baking soda, sugar and coriander in a bowl
 - cut in the butter until you have a coarse crumb
 - beat the eggs slightly, then whisk with the buttermilk
 - add the wet mix to the dry and stir to combine
 - once the dough has started to come together, transfer it to a floured counter and knead smooth
 - cut the dough into equal amounts and roll your buns
 - place the buns on a paper lined tray and brush with milk
 - bake at 350F / 177C for about 12 minutes until golden brown (a larger loaf will take longer)
 - cool on a rack slightly and serve warm

Tuesday, January 29, 2013

Recipe: Pizza dough

Who doesn't like pizza?  It's one of the most loved foods around and even better if you make it yourself.  Homemade pizza also makes for a great interactive theme party - everybody will show up, everyone will want to try their hand at the dough, and if you have a good selection of toppings, there's no telling what crazy and delicious concoctions will result.  My brother-in-law Luis and I teamed p on this for a party and it was a roaring success - at one point we had a bacalao pizza, and the last one of the night had cheese rolled into the outer crust.  What I really like about this dough is that you can have a thicker crust if you like, but if you want to have a thin crust, you can roll this out super thin, and once it bakes up, as long as you don't have a ridiculous amount of toppings, the crust will hold straight without flopping (a major flaw in many thin crust pizzas).  This recipe is the basic dough - by all means take the liberty of adding in some fresh chopped herbs or cracked pepper to really jazz it up.  We mixed this up old school on the table, but you can use a mixer if you want to speed things up.


You will need:

500g                   flour (plus some for bench work)
33g                     fresh yeast (or 11g active dry)
10g                     sugar
5g                       salt
30ml                   olive oil
270ml                 warm water


Method:

 - bloom the yeast in the warm water with a bit of the sugar
 - mix the flour, salt and the rest of the sugar
 - make a well on the table with the flour
 - add the oil and the bloomed yeast water into the well
 - using your fingers and moving in a circular motion, start swirling the liquid
 - gradually expand the circle to incorporate the flour
 - once all the flour is incorporated, knead the dough
 - add any flour necessary to get the dough to a smooth ball
 - place in a bowl, cover with plastic wrap, and let proof to double the size
 - punch down the dough, and depending on the size of pizza and crust thickness, cut into 2, 3, or 4
 - roll the balls and let proof again
 - lightly oil your pizza pan
 - roll out your dough to the desired size and thickness
 - transfer to the pan
 - dock the dough  
 - dress it up
 - bake at 350F - 400F depending on thickness (higher temperature for thin) for about 10 - 15 minutes
 - dig in


pepperoni stuffed crust pizza

Saturday, November 3, 2012

Recipe: Honey rye sourdough bread

This is a nice sourdough to get started with using your starter.  You will need to have a little dark rye flour on hand, and it's always best to use bread flour if possible as the added gluten will help hold the shape as the yeast expands.  As with using a sour starter which will have a variable moisture content, you may need to adjust the flour to get the texture right - keep a little flour aside during the initial mixing, then add enough it to the dough to bring it together.  Depending on your style, this recipe will make one large or two smaller loaves.

You will need:

440g            bread flour
60g              rye flour
150g            sour starter
20g              honey
10g              fresh yeast
250ml          warm water (not hot)
10g              kosher salt

Method:

 - if using a dry yeast, bloom it in the warm water
 - weigh out all ingredients
 - keep aside a little flour, add everything else into a mixing bowl and mix with a dough hook
 - if necessary, add some flour to "dry" it out a little
 - when you have a good smooth and firm ball of dough that doesn't stick to the bowl, move to the counter
 - knead the dough a little, round it up and place it in a bowl
 - cover the bowl with plastic wrap and let it proof to double its size
 - punch it down, shape the loaf and place it on a paper lined baking tray
 - cover and let it proof again
 - preheat the oven to 365F / 185C
 - when the bread has doubled in size, make a few cuts along the top
 - bake for about 20 minutes
 - check the bread by knocking it, if it sounds hollow remove, if not give it a little more time
 - cool on a rack
 - serve

Thursday, November 1, 2012

Recipe: Potato and caramelized onion sourdough starter

Sourdough can be a real passion.  It's your friend in the fridge that grows and develops a personality over time - sad and starving if you neglect it, happy and fluffy if it's fed when hungry, it may try to escape if you feed it and don't tame it by taking some out.  I'll always try a sourdough if offered a selection of breads because regardless of recipe each individual starter has its own particular character and I'd hate to miss out on trying one.  If you find a bakery with a sourdough bread that just sings to you - remember them and patronize them because nobody else in town will ever have the same flavour (even theirs will evolve with time).  Other bakeries may be just as good, but never the same.  One day, when I get to San Francisco for a reason other than changing planes, I'm searching out one of the bakeries with a starter over 100 years old.  I even wonder sometimes if a starter can be insured - if a bakery burns down, sometimes the starter may be one of the greatest losses.

While making a starter is relatively easy, the commitment to bread production is the larger task at hand.  What if you go on vacation?  You may trust your neighbour to feed the cat, but will they feed the starter?  For this reason, commercial operations are usually where you'll find starters, but if you make a lot of bread at home already, by all means you should have one on hand.  This recipe is relatively basic, but the potential variations are endless and you can develop your own according to your taste.  

Developing and maintaining your starter's particular character is eventually a product of the feeding process - be regular and consistent with the formula you choose.  You can change things up by changing the feeding flour, just remember there will be a gradual transition as consistency re-sets itself.  I used to use a really good rye starter, but over time the regular additions of rye flour really darkened the product up, so we'd periodically give it a meal of white flour just to lighten it and keep it a bit more versatile (we used it for more than just rye sourdough).  Certain infusions can help give your starter a nice flavour too (herbs or aromatic vegetables such as fennel), just remember to take anything you added out after a couple days - you don't want it decaying on you, and it gets frustrating dealing with random bits floating around the starter. 

Feeding the starter.  It's possible to wing it, but consistency is always a better idea.  A good idea is to weigh the bucket or whatever vessel your starter will call home, then write the weight down - even right on the bucket.  Assuming you keep your starter in the fridge, once a week, when it's time to feed, weigh the bucket, starter and all, then subtract the weight of the bucket itself.  Calculate 1/3 of the weight.  For that 1/3 weight, measure out 60% flour and 40% filtered water (chlorinated tap water is best avoided if possible).  Add the flour and water to the starter and stir vigorously before returning to the fridge.  If you have something like a rye starter, you will want to work out a ratio of rye flour to bread flour for your flour portion.  If you don't have filtered water, leave tap water out for a day or so to let the chlorine dissipate.

If your starter gets a bit large to handle, move it along.  Give it to friends, make more bread (even pancakes), or you can store it as insurance in case something happens to the main starter.  One way is to feed the starter, then freeze it in an airtight container.  This way, the starter has some food to eat as it thaws out.  The other way is to feed the starter, then spread it out on paper lined sheet pans and let it dry in the open air for a couple days.  Then you can break it up and store it in an airtight container in the pantry.  When bringing it back, just rehydrate it with a little filtered water.

You will need:

500ml / 2C           whole wheat or rye flour (you can switch to bread flour once the starter is alive)
500ml / 2C           filtered or bottled water
1-2                        potatoes
1                          white onion

Method:

 - peel and chop the potatoes
 - cover the potatoes and cook soft over low heat
 - strain the potatoes out and let the water cool
 - cut the onion in half and char the cut sides in a fry pan
 - mix the flour and the water with a whisk
 - submerge the onion
 - cover the starter with a loose lid or cheesecloth (it needs to breathe) and keep at room temperature
 - after a day or so (depending on your climate), the starter should look foamy and smell like sourdough
 - cover the starter with a tight fitting lid and store in the fridge
 - remove the onion after a couple days
 - use as needed and feed accordingly

Tuesday, August 28, 2012

Recipe: Banana bread

Banana bread rarely needs an occasion.  Whether using up some extra ripe bananas or satisfying a craving, bake a loaf or two up and people seem to line up for their share.  If you don't have ripe bananas around, I find that slow roasting them in the skins brings out the sweetness you're looking for, and actually keeps them from browning during the baking process, giving you a paler loaf for a nice change.

You will need:

454g / 1lb            ripe bananas
454g / 1lb            brown sugar
2                          eggs
250ml / 1C          canola oil
250ml / 1C          milk (homo is best)
454g / 1lb            pastry flour
14g / 1/2oz          baking soda
pinch                   salt
as needed            butter or pan spray


Method:

 - set the oven to 350F / 177C
 - butter or pan spray two standard loaf pans (to stick the paper)
 - line the pans with parchment paper
 - mash the bananas
 - in a mixer with a paddle, mix the bananas and brown sugar
 - lightly beat the eggs and add to the mix
 - sift flour, baking soda and salt together
 - combine the milk and oil
 - add the wet and dry mixes alternately in 3 stages, finishing with the last of the dry
 - divide the mix between the two pans
 - bake at 350F / 177C for 45 minutes to an hour until a skewer comes out clean
 - cool on a rack
 - to unmold, gently run a knife around the edge of the pan anywhere not covered by paper and turn out

Monday, April 9, 2012

Recipe: Monkey bread (savory)

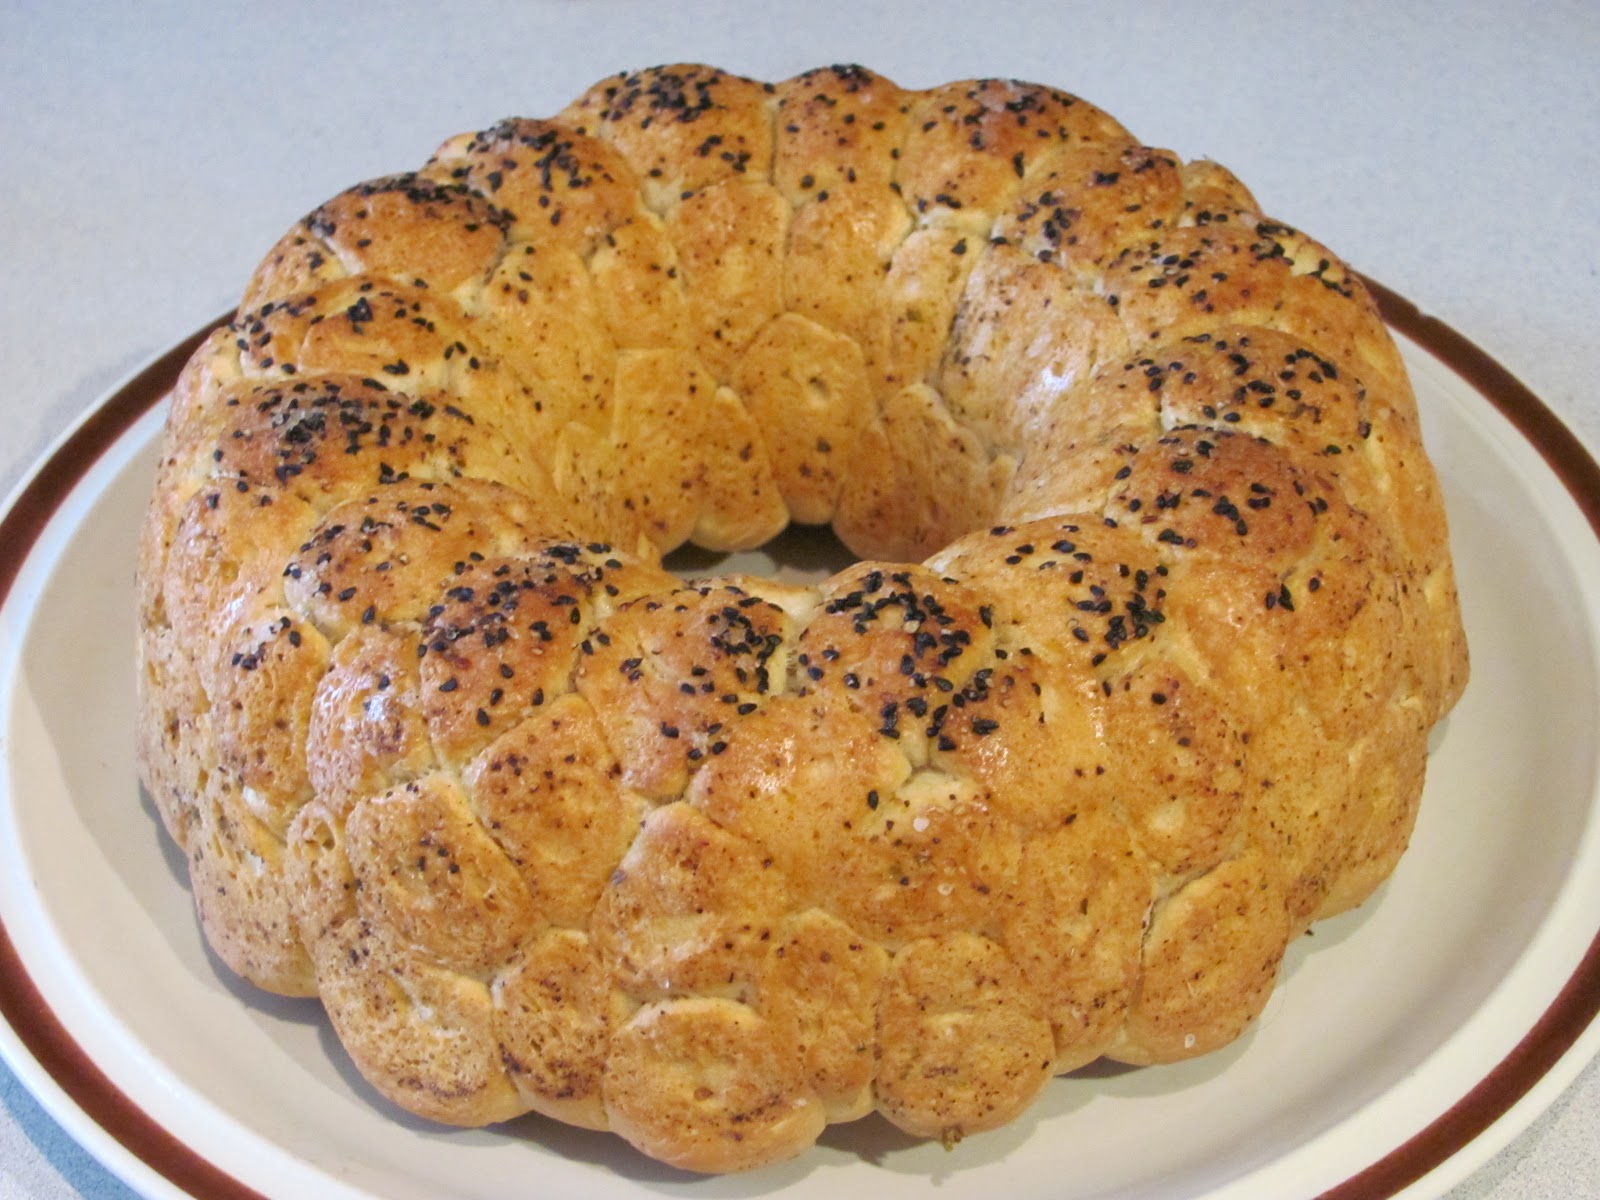
After the roaring success of the first monkey bread last week, the ideas got spinning.  The most obvious and immediately doable would be a savory version - the rough plan was to simply replace the butter with olive oil and the sugar and spices with herbs, pepper and salt.  We were going to a large potluck, so I divided the dough into smaller pieces to make sure the bread would break up enough to serve everyone.  Since I put herbs in the dough, at the rolling stage, I just used olive oil, but when I coated the bundt pan, I dusted it with coarse cracked pepper, kosher salt and kalonji (onion seed).  The result was great - very focaccia-like.  Whether it was the smaller balls or the olive oil, the bread tore apart slightly less easily, not a problem, still a great bread, but next time I might go back to the larger balls and use butter in the rolling just to see - definitely keep the olive oil in the dough though.  There are a few changes in the recipe other than the obvious - there's more salt, so I kept some sugar to feed the yeast,  and to make it more bread-like, I used more flour to get a dryer dough.


divide and roll
You will need:

14oz / 400g              milk (homo)
1 Tbs / 0.3oz / 8.5g  instant yeast (or 10.3g active dry yeast or 25.5g fresh)
1/3oz / 10g               sugar
19.6oz / 555g           flour
0.4oz / 10g               kosher salt
1 tsp / 0.5g               dry oregano
1 tsp / 0.5g               dry rosemary (crushed or chopped fine)
1 tsp / 0.5g               cracked black pepper
4 Tbs / 43g              olive oil
prepare the pan

For the pan:  

olive oil
coarse cracked black pepper
kalonji (onion seed)

For the rolling:

olive oil

Method:

layer up the dough
 - warm up the milk and bloom the yeast with a bit of the sugar (if necessary)
 - if using instant yeast, add it to the flour and salt
 - in a mixer, combine the milk, yeast, olive oil, herbs and pepper 
 - add in the flour mixture and mix until you get a smooth dough that comes away from the side of the bowl
 - turn the dough out on a floured surface and round it up
 - coat a bowl with a bit of olive oil, place the dough in and cover to proof in a warm place
 - prepare the bundt pan with olive oil, salt, pepper and kalonji
 - once doubled in size, turn the dough out on a floured surface, punch it down and divide it up
Shaolin wanted to help this time
 - roll the balls, coat in olive oil, and layer into the pan
 - cover and return to a warm place to proof up again
 - set oven to 340F / 171C
 - once doubled in size again, set the pan in the oven and cook 40-45 minutes - rotate if necessary 
 - remove from oven, let rest a moment, then turn out onto your serving dish
ready for the oven
 - serve warm


ready to eat


Wednesday, April 4, 2012

Recipe: Monkey bread

Carla and I love monkeys, so when I happened across this recipe I knew I had to make it.  Part of the intrigue was the inherent craziness of it - a dessert made not only from a yeast dough, but divided into a multitude of little balls, rolled in butter and cinnamon sugar, then reassembled and baked off as one.  You also aren't allowed to cut it with a knife since you can just pull the pieces off as you eat them.  


Bruja likes to help me proof bread
The first recipes I came across called for instant biscuit mix, which turned me off, then I came across one by Chef Michael Smith on the Food Network site that used yeast, so I decided to give it a whirl.  It's also this recipe that gave me so much trouble converting ingredients to weights, but I finally got it, and it's all weighed out for you here.  One example of why I'm a stickler for weighing ingredients is flour - a sifted cup of flour will weigh a lot less than a packed one, and throw the recipe out of whack.  Sorry Chef, I didn't follow the recipe exactly,  I added some sweet spice to the dough, and during the execution the flour and liquid amounts were adjusted slightly as I saw it coming together in the mixer - it was a bit like math class here as I was subtracting amounts from a recipe recently converted.  Happily, the result was fantastic and the measurements as I did them are all here.  I also topped it with some chopped up banana chips after cooking - monkeys love their bananas.  I served it for my monkey brother's birthday with some mango sorbet that Carla made - perfect.

You will need:

2oz / 56g                               unsalted butter, melted
14oz (just under 2C) / 400g  milk (homo) - yes I weigh my milk - the scale is already out
1/4C (1oz) / 30g                    golden or brown sugar - loose pack if using 1/4C measure
1                                            vanilla bean (scraped) - 1Tbs / 15ml extract, but the dough will be wetter
1Tbs (0.3oz) / 8.5g                instant yeast - or 10.3g active dry yeast - or 25.5g fresh
4C (18oz) / 515g                   flour
punch it down and cut it
1tsp / 6g                                salt
1/2tsp / 0.5g                          grated nutmeg
1/2tsp / 0.5g                          ground cinnamon

for the rolling:

1/2C / 113.5g                        unsalted butter, melted
1C / 200g                              white sugar
2Tbs / 6g                               ground cinnamon

roll the balls
for the topping:

chopped banana chips

Method:

 - unless using instant yeast, warm up a bit of the milk, add a portion of the sugar and bloom the yeast
 - if using instant yeast, mix it with the flour and salt
 - mix the vanilla, nutmeg, cinnamon and brown sugar
 - in a mixer with a dough hook, mix the melted butter, spiced sugar, milk and yeast
layer into the bundt pan
 - add the flour mixture and mix until dough is smooth, shiny and comes away from the bowl - it will be a bit wet and sticky
 - turn it out onto a floured board and round up
 - place in a lightly oiled bowl, cover and place in a warm area to proof
 - once double in size, punch it down and turn out onto a floured board
 - cut dough into small pieces and ball them up
 - melt the rolling butter
 - mix the cinnamon sugar for rolling
 - lightly oil a bundt pan
 - coat the balls in butter, then roll in the cinnamon sugar, then layer them up in the pan
 - set the pan in a warm place and let proof
 - set oven to 340F / 171C
 - place pan in the oven and cook about 45 minutes - rotate if necessary
 - when cooked, remove from oven, let rest a moment, then turn out onto your serving dish
second proofing
 - coat with chopped banana chips while bread is warm (so they stick to the warm butter)
 - serve warm and eat with your hands


tear into it