Tuesday, August 28, 2012

Recipe: Banana bread

Banana bread rarely needs an occasion.  Whether using up some extra ripe bananas or satisfying a craving, bake a loaf or two up and people seem to line up for their share.  If you don't have ripe bananas around, I find that slow roasting them in the skins brings out the sweetness you're looking for, and actually keeps them from browning during the baking process, giving you a paler loaf for a nice change.

You will need:

454g / 1lb            ripe bananas
454g / 1lb            brown sugar
2                          eggs
250ml / 1C          canola oil
250ml / 1C          milk (homo is best)
454g / 1lb            pastry flour
14g / 1/2oz          baking soda
pinch                   salt
as needed            butter or pan spray


Method:

 - set the oven to 350F / 177C
 - butter or pan spray two standard loaf pans (to stick the paper)
 - line the pans with parchment paper
 - mash the bananas
 - in a mixer with a paddle, mix the bananas and brown sugar
 - lightly beat the eggs and add to the mix
 - sift flour, baking soda and salt together
 - combine the milk and oil
 - add the wet and dry mixes alternately in 3 stages, finishing with the last of the dry
 - divide the mix between the two pans
 - bake at 350F / 177C for 45 minutes to an hour until a skewer comes out clean
 - cool on a rack
 - to unmold, gently run a knife around the edge of the pan anywhere not covered by paper and turn out

Saturday, August 25, 2012

Recipe: Garlic oil / roasted garlic vs confit garlic

A lot of people list roast garlic as one of their favorite things.  It's great to sit at a table with some good bread and a fat bulb of roasted garlic and dig in.  It's less great when a recipe calls for roasted garlic and you have to roast the bulb, then squeeze out the garlic one by one to get what you need.  What I started doing over the years was converting to poached garlic to the point that it's all I use now except when serving the traditional roasted garlic as a dish on its own.  For the cooking process, the benefits are huge.  It's much easier to peel raw garlic in bulk than after cooking (and you always lose some garlic that sticks to the skins) and you always end up with some super-flavourful oil to use later cooking something else.  The poached cloves also retain their shape superbly and make great garnishes for antipasto or charcuterie platters.  If you like, you can add herbs to the poach and both flavour the garlic and the resulting oil.  Either method you choose, here's the method for each.

Roasted Garlic

Method:

 - set the oven to 350F / 177C
 - peel away the outermost skins of the bulb, just leaving the inner one or two
 - trim the top of the bulb to expose the tips of the cloves
 - place the bulb in a ceramic dish or in some tin foil
 - drizzle the top of the bulb with olive oil
 - wrap the tin foil around the bulb and place in the oven
 - roast for about 45 minutes - make sure the cloves are soft
 - let cool slightly
 - serve


Poached garlic

Method:

 - peel all the skins off the garlic, separating the cloves and peeling them as well
 - trim the root ends from the cloves
 - submerge the cloves in the oil of your choice (I often use grapeseed to keep the oil's flavour pure garlic
 - add any herbs you like
 - slowly bring up to a medium heat - try not to even simmer
 - let cook until fully soft
 - cool in the oil
 - strain the garlic out of the oil and drain well
 - reserve the oil for later
 - use the garlic as needed

Friday, August 24, 2012

Recipe: Arugula pesto

I like making this version of pesto because I really enjoy the peppery flavour of arugula.  It still has some basil in it as a reminder of its roots and is still as versatile as a base for a pasta sauce, spread for crostinis or thinned out with a bit more oil as a marinade.  I always give my arugula and basil a good pre-chop since the friction in the food processor can dull the green colour as it blends the leaves.  For the same reason of colour, if you aren't using the pesto right away, I recommend leaving the lemon juice out for now.  You can always add it later as you use it, and the lemon's flavour will be fresher then too.  If you find this mixture too thick, you can add some more olive oil, but I usually like to keep it thick until I'm sure of the intended use, then adjust accordingly.  If you are wondering why I mince the garlic and finely grate the Parmesan cheese when it's all going into a food processor, it's because depending on the processor you use, it may be hard to get the two ingredients as fine as you want them - this way you know the two are already fine and will spread out through the mix properly.  The processor is primarily for the pine nuts, arugula and basil.

You will need:

250ml / 1C          chopped and firmly packed arugula leaves
60ml / 1/4C         chopped and firmly packed basil leaves
1                          garlic clove
125ml / 1/2C       grated Parmesan cheese
125ml / 1/2C       extra virgin olive oil
60ml / 1/4C         pine nuts
to taste                 kosher salt
to taste                 black pepper
to taste                 fresh lemon juice 

Method:

 - lightly toast the pine nuts and let cool
 - grate the parmesan - use a microplane if you can
 - mince the garlic
 - roughly chop the arugula and basil
 - put the Parmesan, pine nuts and garlic in a food processor and blend well with a bit of the oil
 - add the chopped arugula and basil and the rest of the oil
 - use short pulses to incorporate the greens into the mix (this keeps the motor cool and the friction low)
 - season with salt and pepper (and lemon juice if using right away)
 - add any extra olive oil you want
 - give the mix one good extended blend to chop the leaves the rest of the way
 - use as needed or store in the fridge

Recipe: Bacon sherry vinaigrette

This vinaigrette is not only delicious, it is very versatile in its uses.  It can be used as a light sauce for  chicken or fish dishes (great with black cod), and even makes for a great warm salad dressing with sturdier greens such as spinach or arugula.  There's no blending needed - leave it chunky.

You will need:

250ml / 1C         tyroller bacon lardons (thick cut batons)
250ml / 1C         minced red onion
15ml / 1Tbs        minced garlic
60ml / 1/4C        sherry vinegar
250ml / 1C         extra virgin olive oil
to taste               kosher salt
to taste               cracked black pepper

Method:

 - put the lardons in a pan and slowly render the fat out
 - when the bacon is nicely coloured, remove it from the pan, leaving the fat
 - add the red onion and garlic and sweat well
 - return the bacon to the pan
 - deglaze with the sherry vinegar
 - remove from the heat
 - add the olive oil
 - season with salt and pepper

Wednesday, August 22, 2012

Green peppers

I want to take a moment to stick up for an old friend of mine, the green pepper.  If you are in the industry, you probably know what I am talking about, but if you aren't, let me explain.  There is an unfair bias against green peppers in the food industry.  I have worked in major hotels who will search out obscure and eclectic ingredients to use (a characteristic I love), but despite the fact that the green pepper is the number one requested addition to a room service pizza, a flat out refusal was in place to even have a few on hand.  "Low class vegetable" it was labelled.  Want sauteed crones on your pizza?  Done and done.  Green peppers?  Forget it.

I've worked in other places where chefs are searching high and low for the most shocking proteins to serve (prairie oysters or a brain terrine), but suggest that a certain dish might benefit from some green pepper, you are met with indignant scoffs - unthinkable, shocking that you would bring such a thing up. 

Nothing at all against other types of bell peppers, I just believe that everything has it's place, and to shut any ingredient out of the kitchen 100% is limiting yourself.  Stay open, stay flexible, and give the mean green a chance.

Tuesday, August 21, 2012

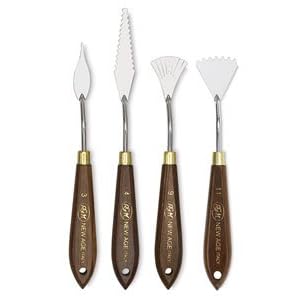
Product review: RGM New Age painting knives

RGM New Age Painting Knives - New Age Painting Knives, Set of 4This may seem like an odd item to review, but if a spray gun can be used for chocolate, why not switch up the style of palette knives used in the kitchen a bit.  Regular palette knives are already a must have for handling delicate items, this just adds a bit of style to the plating process.  Swooshes, schmears and comets are all good, but the repertoire could use a little expansion, after all plating a dish is often compared to painting a picture.  RGM is a company that makes a wide variety of different shaped palette knives designed to create textures and patterns with paint - it works the same with coulis, aolis and sauces.  The set pictured is a great starter variety of palette knives for a few different effects, and if you enjoy using them, you can explore the line further.  CHECK IT OUT HERE.


Monday, August 20, 2012

Recipe: Potato blinis

Potato blinis are classic with caviar, but can be served with innumerable spreads and garnishes to create a wide variety of appetizers, hors d'ouevres, and amuse bouche.  Try to keep the mix hot while mixing and try to avoid over working the starch (fold the batter, don't stir).  The finished batter should be firm enough to hold a shape, but soft enough to push through a piping bag.   A non-stick pan helps the production process as well.

You will need:

3                     medium Yukon gold potatoes
45ml / 3Tbs    flour
1                     egg yolk
1                     whole egg
45ml / 3Tbs    sour cream
to taste            kosher salt
to taste            pepper

Method:

 - set the oven to 350F / 177C
 - prick the potatoes with a fork and roast about an hour until very soft inside
 - lightly whip the egg and egg yolk, then mix with the sour cream
 - scoop the potato out of the skin and pass it through a tamis sieve (or ricer) into a bowl
 - sprinkle the flour over the potato, add the egg and cream mixture and fold together
 - season with salt and pepper
 - put the mix into a piping bag
 - add some butter to a pan
 - pipe small dollops into the pan
 - cook until golden brown on bottom, then flip and do the other side (you can gently pat it down if needed)

Recipe: Candied tomatoes

A dish of candied tomatoes fits well alongside a platter of artisan cheeses or a selection of snacks and tapas.  It's a small amount of work, but they really stand out when done.  Take advantage of prime tomato season and make it with a variety of heirloom cherry tomatoes.  Sungolds are exceptional and give a nice colour contrast with the usual reds.

You will need:

500ml / 2C        heirloom cherry tomatoes
as needed          granulated sugar (125ml / 1/2C should be enough)
pinch                 salt
1                        lemon juice

Method:

 - set some water on to boil for blanching
 - have an ice bath ready
 - score the tomatoes (make small "x" cuts in the skin on the bottom)
 - put the tomatoes in the ice bath a couple minutes
 - transfer the tomatoes to the blanching water for 15 - 20 seconds
 - return to the ice bath and let cool completely
 - peel the skins off the tomatoes
 - put the tomatoes in a bowl and toss with sugar
 - set the bowl in the fridge overnight
 - drain off the excess liquid
 - put the tomatoes in a pan and gently cook over low heat until softened
 - add lemon juice, stir, and let cool
 - refrigerate until use

Saturday, August 18, 2012

Recipe: Pepper spice paste

This concoction is good to have around when you want to add some zip to a dish without simply reaching for a bottle of Tabasco.  It has a nice amount of heat to it, but more importantly has real depth of flavour.  We used to use this for an Isreali couscous risotto, but it would be well adaptable to stir-fries, meat sauces, chili, or pasta salads.  I've left salt out of the recipe so all the seasoning is left to the larger dish.

You will need:

2                        red bell peppers
1                        yellow bell pepper
6                        cloves garlic
50g /1.8oz         ginger
5ml / 1tsp          cumin seeds
1.25g / 1/4tsp    coriander seeds
3                        star anise
5ml / 1tsp          mild curry powder
2 pinches           ground mace
30ml / 2Tbs       grapeseed oil

Method:

 - core, seed, and roughly chop the peppers
 - take the root off the garlic and crush
 - peel the ginger and grate on a microplane (to get the fibres out) or mince
 - set the peppers, garlic and ginger in a food processor and puree smooth
 - toast the cumin, coriander and star anise in a frypan, then grind to a powder in a spice mill
 - mix the mace and curry powder with the spice mix
 - put the oil in a pan and add the spices and pepper puree
 - over medium-low heat, cook out the mix until the extra liquid is cooked off and it has a paste consistency
 - cool
 - store in the fridge and use as needed

Friday, August 17, 2012

Recipe: Pomme Maquere

Pomme Maquere is not seen very much, but it is a very nice way to use potatoes and gives you an opportunity to surprise your guests.  It's similar to a Duchess potato in that you mix some egg yolk into a potato puree, but has the added element of surprise by the inclusion of a concealed parcel of your choice in the middle - like a really fancy gravy volcano.  If you have or can get a hold of a silicone muffin mold it makes things really easy, but you can still freestyle it on a tray - just make sure your potato mix is nice and firm when you start as you'll need to build up the sidewalls.  Your filling should be made ahead of time so you can pipe the potatoes warm, fill the Maqueres, then cap them off before the potatoes cool off.  The filling can be anything you like, but as an example here, we'll use a nice creamed out wild mushroom saute.  Depending on the size of your potatoes and how much you fill the Maqueres, this recipe should give you 4 - 6 portions in  muffin molds.

You will need:

2                      large Yukon gold potatoes
3 - 4                 egg yolks
45ml / 3Tbs     cream
15ml / 1Tbs     butter
to taste             kosher salt

For the filling:

1L / 4C            assorted wild mushrooms (rough volume measure)
1                      shallot
1                      garlic
15ml / 1Tbs     butter
to taste             cream
to taste             kosher salt
to taste             black pepper

Method:

 - for the filling, cut or tear the wild mushrooms into small pieces
 - sweat the shallot and garlic in the butter in a pan
 - add the mushrooms and saute well
 - season with salt and pepper
 - add cream as desired
 - cook out until the mixture has a nice saucy consistency and tastes great
 - set aside and let cool
 - set the oven to 350F / 177C
 - butter or panspray the muffin molds and set on a baking sheet
 - prick the skin of the potatoes with a fork and roast in the oven about an hour until completely soft inside
 - heat the butter and cream together and set aside
 - open up the potatoes and pass through a tamis sieve
 - measure the potatoes by volume - calculate one yolk per cup (250ml) of potato
 - gently mix the hot potato with the hot cream and butter and season with salt
 - lightly whisk the egg yolks and fold through the potatoes
 - put the potato mixture in a piping bag
 - pipe a solid bottom in the muffin mold, then run around the outside, leaving a cavity in the middle
 - fill the cavities with the mushroom mix
 - use the rest of the potato mix to completely cap off and seal the mushrooms in
 - put the baking sheet in the oven about 15 minutes to set the egg and lightly colour the potato
 - remove from the oven and let cool
 - when the Maqueres are cool and firm, you can remove them from the molds
 - set the Maqueres upside down on a paper or silicone mat covered sheet pan
 - to serve, reheat in the oven