Friday, March 29, 2013

Recipe: The Mac and Cheese burger

so good it's just plain stupid
You could call this the Mackin' Cheeseburger and it would be just as right.  Never has a burger paid such tribute to the world's most popular topping for meat.  As this burger developed, it became clear that the meat component would wind up garnishing the cheese instead of the other way around.

It was Dan's idea to do a macaroni and cheese burger.  At first I wasn't so sure as my first visions were of some crazy pasta based Sloppy Joe - we would make it tasty no doubt, but was it inspired?  After some ruminating, it came to me to stretch our definition of macaroni and cheese to include other burger friendly pastas, namely lasagna.  We could layer pasta, cheese and sauce up into a patty of its own, which would then fit nicely in a burger bun.  Since macaroni is often topped with bread crumbs, we would have to bread it and deep fry it for best results, a sacrifice both Dan and I were willing to make.

the cheese patty before breading
The construction of the cheese patty was quite the production.  We first cooked off large sections of pasta sheets and laid them out to cool.  Then rounds were cut to suit the size of the burger buns.  Layering up, we started with pasta, then jalapeno jack cheese, another pasta, brie cheese, another pasta, then smoked cheddar and finally the top layer of pasta.   Cold Alfredo sauce (so it would be thicker) was liberally brushed over every layer except for the very tops and bottoms.  The patties were frozen for better handling, then double breaded with finely ground panko bread crumbs and returned to the freezer to set.  

Now the rest of the sandwich.  Macaroni and cheese doesn't normally get that much in the way of dressing up - ketchup, maybe some hot sauce - some places might match it up with some short rib.  Since the cheese patties were now looking pretty intimidating, we felt that a saucy pulled short rib would let us ease back on the overall weight of the sandwich, and should be arranged on top of the cheese.  Our bacon and tomato jam kicks ketchup's ass any day of the week, so it would be our "ketchup" on the bottom bun.  Pickled banana peppers would throw some nice heat and very necessary acidity into the mix.  Dan also mixed up a nice Dijon Alfredo for added sauce and filling the "mustard" slot.  With all these powerful flavours going on, arugula was the only green to handle the job.  For the first time ever - EVER - the top bun got no sauce, no spread, no nothing, it just wasn't needed.  Just to be sure we didn't leave anything out, we added some crispy fried onions.

everybody in the pool!
The execution.  Any worry of cheese leakage from the patties was unfounded and they held strong.  Once they had coloured nicely, they needed a little oven time to completely heat through, but were intact and crispy.  The short rib and Dijon Alfredo were simply heat and serve,  and the rest was assembly.  Eyes began to bug out and fear filled the room as these monsters came together.  Most of the eaters were going to try their hand at half a sandwich, but I was committed to putting  a whole one away (I used do battle with the 1lb burgers at the original Save-On-Meats on Hastings).  The first burger got cut, and "oh my god" was all anyone could say - the cheese just flowed like some wonderful fountain.  I got into mine and couldn't believe how good it was - it wasn't too saucy, and the taste was incredible.  I finished mine almost without pause, then cleaned the plate.  Truly amazing.  Completely nuts.  Beyond ridiculous.


The Mac and Cheese burger:

it's ok to be afraid, but better to be brave
 - bun - brioche
 - patty - (4) rounds of sheet pasta
            - jalapeno jack cheese
            - brie cheese
            - smoked cheddar cheese
            - Alfredo sauce
            - breaded
            - deep fried (finished in oven)
 - meat - pulled short rib in red wine jus
 - sauces - bacon tomato jam
               - Dijon Alfredo
 - greens - arugula
 - pickles - banana peppers
 - garnish - crispy fried onion


Wednesday, March 27, 2013

Recipe: White chocolate cream

emulsify the chocolate and milk
This recipe is nice and simple, but beautifully rich and creamy.  It's similar to a mousse, but instead of gelatin, utilizes the binding power of the chocolate as it cools to hold the air.  This is good if you are serving vegetarians who don't want animal based gelatin.  This is also the dessert I mentioned in the previous post that can be dressed up like a tiramisu in the sense that all the same flavours and garnishes work well, but as a purist, I don't advise outright calling it a tiramisu - you might get called out on it.  This recipe will half-fill 6 martini glasses, which is a nice amount due to the richness and leaves lots of space arrange garnishes in the glass.


You will need:

soft whip the cream
164g / 5.8oz                  white chocolate
60g / 2.1oz                    milk
126g / 4.4oz                  cream


Method:

 - gently warm the milk and chocolate over a bain-marie to emulsify (not too hot)
 - whip the cream to a very soft peak
 - fold the cream into the chocolate mixture
 - pour the mix into glasses (it is pourable)
 - transfer to the fridge to cool completely and set up
 - garnish as you like and serve
fold
fill


with coffee gelee, ladyfingers, chocolate wafers, cocoa and shaved chocolate


Tuesday, March 26, 2013

Recipe: Coffee and Grand Marnier gelee

Coffee gelee has a way of working it's way around a menu.  One of the most popular uses I've seen a lot are interpretive versions of tiramisu.  As the original dessert can be a bit difficult to serve clean, it is often easier to make a  tiramisu flavoured bavarian or mousse and set it up in a glass.  The coffee element then often finds itself as a gelee in the bottom of the glass, or set up separately, cut into cubes and served on top as a garnish.  When I made this recently, I did the latter.  While my dessert tipped its hat to tiramisu, it was different enough I didn't feel bound to use rum or Marsala as the participating alcohol, and went with one of my favorites, Grand Marnier.  I like the ratio of gelatin in this, it is firm enough to cut and handle, but still soft and delicate.

You will need:

450ml / 15.2oz                     strong brewed coffeee
50ml / 1.7oz                         Grand Marnier liqueur 
30ml / 2Tbs                          sugar
6 sheets                                gelatin

Method:

 - soak the gelatin in cold water, then drain
 - measure out the hot coffee
 - stir in the sugar
 - melt in the gelatin
 - stir in the liqueur
 - set in a dish about 1cm deep
 - let set up completely
 - cut cubes and use as needed


Sunday, March 24, 2013

Recipe: Baklava - West coast style

mix the fruits
I have a soft spot for baklava, but many people find it too sweet.  In order to be able to justify making some, the first time I made it, I had to think carefully about the process and make adjustments to make sure it appealed to a wider audience.  We're pretty granola out here on the west coast, so I decided to pack it full of a big variety of dried fruits and nuts so despite the inevitable sugar content, there would be some hidden food value there.  I also went with something of a slow roast to cook it, basting it with syrup periodically instead of soaking it in syrup at the end.  The final result is fruity, nutty, sweet and crispy (but not dry).  It's unmistakably a baklava, but those who were skeptical at first glance were converted at first bite and asking for seconds.  This recipe made two rolls, so you can multiply up or down accordingly.  Don't bother chopping the fruits in a food processor - you will get a paste - just chop them by hand.  The nuts can be chopped in a processor, just be careful not to make butter.  For the small difference it makes, all the measures for the fruits and nuts are made after chopping (to keep them all even with each other).
mix the nuts


You will need:


for the pastry:

4 sheets                    filo pastry
as needed                 melted butter
as needed                 sugar
as needed                 poppy seeds
as needed                 simple syrup (one cup should be enough)

lay the fruit on the buttered filo

for the filling:

60ml / 1/4C             mixed candied peel (see earlier post for recipe)
60ml / 1/4C             dried blueberries - chopped
60ml / 1/4C             dried cranberries - chopped
60ml / 1/4C             dried apricots - chopped
60ml / 1/4C             dried figs - chopped
60ml / 1/4C             hazelnuts - toasted and chopped
60ml / 1/4C             pine nuts - toasted and chopped
60ml / 1/4C             pistachios - toasted and chopped
60ml / 1/4C             pecans - toasted and chopped
60ml / 1/4C             walnuts - toasted and chopped
dust with sugar and poppy seeds
as needed                 slivered almonds - toasted and crushed by hand (save for the end)


Method:

 - set the oven to 325F / 163C
 - mix all the fruits in a bowl
 - mix all the nuts except for the almonds in a bowl
cover with the chopped nuts
 - take two of the sheets of filo, butter both sides and lay on a paper lined pan
 - divide the fruit between the two sheets and make a log at one end
 - dust the rest of the filo liberally with sugar
 - go over the sugar with the poppy seeds, stopping short at the far end of the filo
 - sprinkle the mixed nuts evenly over the sugar and poppy seeds - mind the gap
 - butter both sides of the other two sheets of filo
 - dust one side with sugar
 - lay the sugar side down over the dressed up sheets of filo and gently press down
 - carefully start rolling the filo starting at the fruit end and ending with the gap on the bottom
cover with butter and sugared filo
 - bake the rolls at 325F / 163C for 10 minutes
 - baste the rolls with the simple syrup
 - turn the oven down to 300F / 149C
 - continue to bake, rotating and basting at 10 minute intervals
 - around 45 minutes to an hour, it should be a nice golden colour
 - remove from the oven and baste one last time
 - dust with the crushed toasted almonds
 - cool completely
 - cut slices carefully with a serrated knife and serve

roll


baste with syrup
bake and coat with almonds

Thursday, March 21, 2013

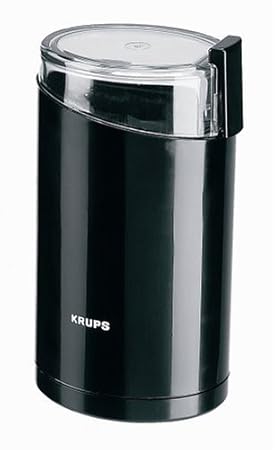
Product review: Krups coffee and spice grinders

Good cooks need to grind spices.  They often could go for a coffee too.  These machines were originally designed for grinding coffee beans, but somewhere along the line someone got tired of the old mortar and pestle and put two and two together.  They did us all a favor.  The coffee grinder has become indispensable in the kitchen to the point that many cooks have two - one for coffee and one for spices (saves the trouble of scrubbing it down between duties avoiding curry coffee).  

I made mustards one year from cumin, coriander, fenugreek, and mustard seeds (of course)  - enough to distribute as Christmas gifts.  As you might imagine, the grinder got a lot of action on production day.  The motor got pretty hot, but kept trucking along to finish the job, and kept working great for years after that.  It finally died after a nasty spill off the counter - my bad, not the manufacturer.  I went out and got another - no need to try another company when the first one fared so well.  CHECK IT OUT HERE.

Wednesday, March 20, 2013

Recipe: Hot cross buns

mix the dough
Not a lot needs to be said about hot cross buns, most people know them and most of those people probably quite like them.  Although most popular around Easter, specifically Good Friday, they've become welcome year round as a sweet bakery choice.  And that's just it, considering all the talented and adventurous cooks I know, almost all of them default to the local bakery to get them.  Shame, Shame.  I caught myself falling into this trap, then considering how much I enjoy them, figured I better get on the task.  This also led to the mixed candied peel recipe in the previous post - if I'm going to make it from scratch, I'm not going to fall back on an inferior ingredient.


You will need:
proof and round up

For the buns:

34g / 1.2oz                 yeast
75g /1/3C                   sugar
180ml / 6.1fl oz          milk
480g / 17oz                flour (plus more for bench work)
2.5ml / 1/2 tsp            salt
3                                 eggs
125ml / 1/2C             vegetable oil
1                                lemon zest (microplane)
2.5ml / 1/2tsp            cinnamon
1.25ml / 1/4tsp          clove
1.25ml / 1/4tsp          nutmeg
1.25ml / 1/4tsp          allspice
arrange the buns in the dish
80ml / 1/3C               dried currants
80ml / 1/3C               mixed peel (see mixed candied peel recipe)

For the syrup:

60ml / 1/4C              water
22.5ml / 1 1/2Tbs     sugar
2.5ml / 1/2tsp           vanilla (I used vanilla paste - same measure)

For the icing:

125ml / 1/2C           icing sugar
7.5ml / 1/2Tbs         milk

 Method:
proof again

 - boil a bit of water
 - pour it over the currants to rehydrate them a bit, then strain them off after 5 minutes
 - warm the milk up in the microwave (just above room temperature)
 - bloom the yeast in the milk with a bit of the recipe's sugar
 - crack the eggs and give them a little whisk
 - measure the spices and zest into the sugar and mix
 - add all the dough ingredients except the currants and peel to a mixer with a dough hook
 - mix on low speed until it comes together - it is a "wet" dough
 - turn up the speed on the mixer for a few minutes to develop the gluten
 - add the currants and peel and keep mixing until well distributed
 - transfer the dough to an oiled bowl and cover with plastic wrap
 - let proof until double the size
bake and glaze
 - butter a 9 x 13 baking dish
 - turn out onto a floured counter and knead slightly
 - divide the dough into 12 balls (or more if you like)
 - roll the balls and arrange evenly in the dish (4 rows of 3)
 - cover again and let proof
 - turn the oven on to 350F / 177C
 - bake the buns 25 - 30 minutes until evenly brown, rotating the pan periodically
 - combine the syrup ingredients, bring to a simmer, then set aside
 - when the buns are done, remove from the oven and cool in the pan
 - brush the buns with the syrup (2 coats was enough for me)
 - mix the sugar and milk for the icing and transfer to a piping bag (or a sandwich bag with the corner cut)
 - on the cooled buns, make the crosses
 - serve
ice the crosses


it's as soft and fluffy as it looks


Tuesday, March 19, 2013

Recipe: Mixed candied peel

A lot of baking recipes call for mixed peel.  After seeing the white chunky stuff they'll try to sell you at the store, I figured I'd better go make my own.  Not only is it better tasting, it has colour and is a lot cheaper in the end (plus you get all the fruit under the peels).

You will need:

2                                 navel oranges
1                                 grapefruit
1                                 lemon
1                                 lime
675ml / 23fl oz           water
675ml / 23fl oz           sugar
pinch                          kosher salt

Method:

 - peel the fruits with a knife, leaving a bit of the pith on the peel (don't use a vegetable peeler)
 - cut the peel into small dice
 - put all the diced peel in a pot and cover with cold water
 - bring to a boil
 - strain
 - cover again with cold water and boil
 - strain again, cover with cold water and boil again
 - add the 675ml / 23oz of water and sugar (add a bit more water if the syrup doesn't cover the peel)
 - add a pinch of salt and bring to a simmer
 - simmer until the piths become translucent - about two hours (or more depending on your simmer)
 - turn off the heat, cover the pot and let rest until completely cool
 - store in an airtight container
 - use as needed

Monday, March 18, 2013

Recipe: Irish soda bread

This is a good recipe for Irish soda bread.  I like its well rounded flavour from the buttermilk and coriander.  Since I like to use this bread for sopping up the juices in a stew, individual rolls are the shape of choice for me - you also get more of the delicious crust than with bigger loaves.

You will need:

1250g / 2.75lb               all purpose flour
12.5ml / 2.5tsp              kosher salt
37.5ml / 7.5tsp              baking powder
12.5ml / 2.5tsp              baking soda
156ml / 2/3C                 sugar
2.5ml / 1/2tsp                coriander
150g / 5.3oz (2/3C)      unsalted butter
3                                    eggs
780ml / 3.3C                 buttermilk
as needed                      milk

Method:

 - set the oven to 350F / 177C
 - mix the flour, salt, baking powder, baking soda, sugar and coriander in a bowl
 - cut in the butter until you have a coarse crumb
 - beat the eggs slightly, then whisk with the buttermilk
 - add the wet mix to the dry and stir to combine
 - once the dough has started to come together, transfer it to a floured counter and knead smooth
 - cut the dough into equal amounts and roll your buns
 - place the buns on a paper lined tray and brush with milk
 - bake at 350F / 177C for about 12 minutes until golden brown (a larger loaf will take longer)
 - cool on a rack slightly and serve warm

Sunday, March 17, 2013

Recipe: Peaches and cream panna cotta

make the compote
I made this recently as a dessert special and the response was outstanding.  I like how the peaches and cream manage to stay separate while sharing the same espresso cup.  You begin by making your way through the silky and mellow cream top, then break into to the delicious peach compote beneath.  I garnished it with a little peach coulis and a raspberry and gave a couple brandied cherries on the side - it seemed like an Okanagan type of thing to do.  This recipe gave me 15 espresso cups with only a little panna cotta mix left over, so you could easily get 6 - 8 portions in a normal dessert ramekin.  The freezing stage is important to keep a clean division between the peaches and the cream - if you don't, you will inadvertently mix the two as you pour in the panna cotta mix.


add the compote to the cups
You will need:


For the compote:

650g /  23oz                     peeled and pitted peaches
60ml / 1/4C                      water
30ml / 2Tbs                      honey
30ml / 2Tbs                      sugar
pinch                                kosher salt


For the panna cotta:

500ml / 2C                      milk
heat the cream mixture
500ml / 2C                      cream
15ml / 1Tbs                    vanilla
60ml / 1/4C                     sugar
6 sheets                           gelatin


Method:

 - take 500g / 17.5oz of the peaches, cut them up and put them in a pan with the water, honey, sugar, and salt
 - quickly bring to a simmer to form the compote, but don't cook too long
 - strain off  some of the syrup
 - use the syrup to puree the rest of the peaches in a blender until smooth
melt in the gelatin
 - divide the chunky peache compote among the cups
 - go back with the peach puree and add to the cups to cover the chunks
 - place the cups in the freezer at least until the top of the compote is firm
 - soak the gelatin in cold water until soft, then drain the water off
 - mix the milk, cream, vanilla and sugar in a pot and just barely bring to a simmer
 - melt the gelatin into the hot mix
 - allow the mix to cool slightly (so you don't melt the compote as you pour it in the cup)
 - gently pour the mix over the compote to fill the cups
 - transfer to the fridge and allow to set up overnight
 - serve


fill the cups


Recipe: Chocolate wafers

mix the dry
These chocolate wafers make great garnishes on desserts.  They taste good, are ultra crisp, and can be broken off in interesting and abstract shapes.  If you want to jazz it up a little, try adding a little black pepper or chili spice to the mix.  This recipe will make enough to spread over a full size sheet pan, or two home size pans.


You will need:

7g / 1/4oz                cocoa powder
85g / 3oz                 sugar
43g / 1.5oz              flour
60ml / 1/4C             milk
mix the wet
1                              egg white
2.5ml / 1/2tsp          vanilla
pinch                       kosher salt


Method:

 - set the oven to 350F / 177C
 - set up a silicone mat or panspray a sheet pan and stick a layer of parchment down and press out the bubbles
 - mix the cocoa, sugar and flour and a pinch of salt
 - lightly whisk the white, then add the milk and vanilla
 - add the wet mix to the dry and whisk smooth
combine
 - spread as thin as possible on the sheet pan
 - bake 10 minutes at 350F / 177C, rotate and bake another 10
 - pull from the oven and cool completely
 - break off random shards and use or store in an airtight container


spread thin


bake