Thursday, November 29, 2012

Product review: Microplane zesters

If you don't have one already, a Microplane zester is an absolute must in your kitchen.  The fine teeth enable you to take only the sweet and tangy outer layer of zest off a citrus fruit, leaving the bitter pith behind.  If grating ginger, the zester will hold onto the majority of the stringy fibres and leave you with a fine mince you would have to slave for with a knife.  Minced garlic, a snap.   Nutmeg and even cinnamon can be grated super-fine and since you are using the whole spice, the freshness of flavour far surpasses any pre-ground product.  A favorite with a lot of people is the job a Microplane does on Parmesan cheese - ultra light and fluffy, there simply isn't a better way to top off your pasta or Caesar salads.

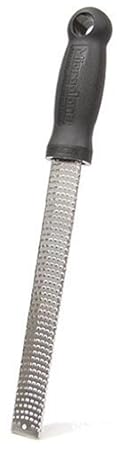
There are some choices in design, which ultimately will come down to preference.  Some are more attractive than others, and you can choose a couple different lengths or widths.  The grating surface is the same in each case, so you can pick the one that suits you best, but I'll share a few observations I've noticed in my experience with the tools.  As for widths, the wide ones will help if grating cheese, but for citrus zest, garlic or ginger, the narrow ones are just fine.  Citrus fruits are round remember, and only a small amount of surface will be in contact with the grater anyway.  I find that the narrow ones fit better into drawers and tool kits, so I tend to stick with that style.  With regards to length, I used a full length one happily for years with no issue, but have seen over-zealous cooks bend them on several occasions, and once they've been bent, the metal is weaker at the folding point and the grater's days are numbered.  My full length grater eventually got nicked by someone, so when I replace it, I went with the shorter model with a handle.  Not that it was ever really any discomfort, but I basically never used the top part of the grater anyway except for holding, so why not get a proper handle and the shorter grating length will be inherently more resistant to pressure.  I still have it years later and it still works like a charm.  Perhaps the important thing to notice was that after my first microplane got stolen there was no question that it needed to be replaced - my set of tools is incomplete without it.  So is yours.  CHECK IT OUT HERE.

Tuesday, November 27, 2012

Recipe: Jamaican patty filling

To continue with the Jamaican patties, Dan and I wanted to keep one of the three varieties we made as close to "traditional" as possible.  That said, my favorite comment I had come across in doing some research was that as long as the filling was tasty, how you got there didn't matter.  Amen.  

Now I can't exactly say this recipe is 100% mine, but I can't say it's 100% anybody else's either.  It is 100% what we made however, and definitely stands as the way I'll do it in the future.  When I research a recipe, I generally scan a wide variety of recipes I have on hand or I come across on line and keep my eye out for the ones that seem most in line with what I'm making.  I then take what I like best about what I came across and put them all into one "super recipe".  In this case I wanted to achieve as complex a flavour profile as possible while staying in the parameters of the "traditional" Jamaican patty.  I have to give a shout out to Emeril, his recipe was one of the only ones that used rum in the mix - an obvious appeal there - and his spice mix went beyond "add X amount of curry blend".  Of course, once armed with our super-recipe and in the heat of the moment, there were adjustments, but the result was stellar.  Here's what we ended up with.  

With reference to size, I've doubled the recipe in order to fit the recipe for the pastry I gave you.  What Dan and I made would only have filled 3 of our extra large patties, so this one will give you six.  Within reason, the size of the patties won't really matter since roughly half the pastry goes on top and the other goes under the meat.

You will need:

907g / 2lbs                       lean ground beef
2                                       large onions - small dice
907g / 2lbs                       tomatoes - small dice
12 cloves                          garlic - minced
2 knuckles                        fresh grated ginger (2 generous tablespoons microplaned)
10 - 12 slices                    pickled banana peppers - minced
6                                       scallions - sliced
60ml / 1/4C                      parsley - chopped
4 sprigs                             thyme - chopped
5ml / 1tsp                         ground anatto (achiote)
20ml / 4tsp                       cumin
5ml / 1tsp                         allspice
5ml / 1tsp                         cardamom
15ml / 1Tbs                      black pepper (feel free to use more if you like it like me)
to taste                              kosher salt
60ml / 1/4C                      dark rum
500ml / 2C                       beef stock


Method:

 - in a large fry pan, brown the ground beef and season lightly
 - remove the beef, saving the fat in the pan
 - fry the onion in the fat until lightly golden, then add the garlic and ginger and cook a few minutes
 - add in the anatto, cumin, allspice, cardamom and black pepper and cook some more
 - add the tomatoes and banana peppers
 - add the beef back in along with the beef stock and thyme
 - let the mixture cook and the liquid come down
 - when the liquid is almost reduced out, add the rum and season with salt
 - when the liquid is basically gone, turn off the heat
 - mix in the scallions and parsley and set aside to cool
 - use as needed in the patties

Saturday, November 24, 2012

Recipe: Jamaican patty pastry

mix the spices and flour
As promised, here's the recipe I used to make the Jamaican patty pastry for our little trip to the Caribbean.  I think this is the most important part about the patties since it has such an important role in what sets this food apart from others.  In so many cases with other types of meat pies, the pastry is often quite neutral - as long as it's flaky, it's acceptable.  With Jamaican patties, there's so much flavour in the pastry itself, it has its own identity within the form.  Indeed, the colour it pretty tell-tale - as I was rolling these out, people instantly knew what I was making.  Not to take away the importance of the filling, but that tends to be the sort of thing that everyone has their style - maybe even handed down from a grandmother.  Dan and I experimented with three different fillings and while one was "traditional", all were indisputably Jamaican patties.  Why?  The pastry was proper.  This recipe made us 6 big patties, but could be stretched to as many as 8 -10 smaller ones.
rub in the butter


You will need:

300g / 10.6oz (2C)         all purpose flour (plus more for working the dough)
175g / 6.2oz (3/4C)        unsalted butter (cold and cubed)
5ml / 1tsp                        curry powder
5ml / 1tsp                       ground anatto seed (achiote)
5ml / 1tsp                       ground black pepper
2.5ml / 1/2tsp                 tumeric
to taste                            kosher salt (about 5ml / 1tsp)
work the pastry
125ml / 1/2C                  ice water
as needed                       egg wash


Method

 - cube the butter and keep it cold
 - mix all the flour, spices and salt
 - add the butter to the flour and use your fingertips to break up the butter
 - when you start to get a pea-sized crumb, add the ice water
 - mix until the dough is just shy of coming together
 - turn the dough out on a floured surface
roll thin
 - use the heel of your hand with a twisting press to mash the butter bits into the four 
 - when the dough has come together, divide into portions (ours were 100g each)
 - use your hands to form disks with the dough and wrap with plastic 
 - let the dough rest (I left mine overnight, but a 1/2 hour will be fine)
 - on a floured surface again, roll the disks out thin
 - transfer to a paper lined tray
 - place your filling on half the patty and egg wash the edge
 - fold the dough over and crimp the edge with a fork
 - cut a few vents in the top
 - heat the oven to 375F / 191C if you have convection, or 400F / 204C in a still oven
 - cook about 15 minutes, rotating if necessary
ready for the oven
 - let cool slightly
 - enjoy!


ready for my belly!


Update: Rompope

rompope topped off with egg nog espuma
A few weeks ago I made the Rompope.  The recommendation was to let it age three weeks in the fridge, so I did.  After looking at it every day, it was finally ripe to try it out.  It was pretty tasty when it was first made, but the time has let all the flavours come together and smooth out.  It is a liqueur, so it's still pretty boozy, but very smooth and perfect for holiday sipping.  Carla even commented that now we don't need to bring bottles back from Mexico anymore since we can do such a good job ourselves.  Next will come flavour variations.  

I did have some egg nog espuma handy, so I had to try the cocktail idea I had mentioned in that recipe - dynamite!  Egg nog and rompope are such close cousins, that it's almost a misnomer to say they complement each other.  Visually, there's a clear division of the thick and rich rompope and the fluffy bubbles of the espuma.  As for the taste, you get the light and airy egg nog first, then get down to the main event at the bottom of the glass.  Garnished with a little grated nutmeg, it's a perfect holiday drink.

Friday, November 23, 2012

Jamaican patties!

The latest foray with the Ultimate Burger Series took a little bit of a sidestep.  We wanted to go Caribbean, specifically Jamaican.  Try as we might to conceive of a Jamaican burger, it all seemed inferior to trying our hands at the classic Jamaican patty.  Since the Burger Series is a fun project and Dan and I agreed at the beginning to be flexible with our definition of "burger", we went with the plan.  

ready to fold and bake
In the spirit of burgers, we had to up the size a bit, and in the spirit of fun, we had to try a few variations.  The dough we made (the recipe will follow) provided for a six big patties, so we decided two would be the traditional ground beef filling (that recipe will follow too), two got a 48 hour short rib filling with corn and a mango and pineapple salsa, and two were filled with grilled cajun chicken and feta.

All three were delicious, and the variations all came across as appropriate to the style.  If one topped out, it might be the short rib if, only on the surprise factor.  It just melted in your mouth and the salsa perfectly cut through the richness.  "Oh my god, this is insanely good" pretty much summed it up.


Sidestep or not, I think we did Jamaica justice (for a couple white guys).  Watch for the recipes.


traditional, 48 hour short rib, and cajun chicken


Recipe: Rum and egg nog espuma (foam)

a very light egg nog
This is a nice twist on serving a rum and egg nog.  I used it as an element on a dessert plate recently, just as a small taste of the Christmas season coming and not wanting to jump in too strong.  I didn't go too heavy with the gelatin on this, I wanted the foam to hold some air and give the option of using a spoon, but also wanted to keep it light and even drinkable like an airy milkshake.  I really liked the visual effect of how once out of the iSi gun, the bubbles expanded slightly, then the gelatin held its ground.  This could be served as I did as an element on a dessert (you can up the gelatin if you want it stronger) or it could be served on its own as a light welcome cocktail at a holiday party.  It would be a perfect top off garnish if you made the rompope recipe and were serving it to guests.  I even made an egg nog cappuccino, but you don't want to wait too long since the heat of the coffee will work against the gelatin in the foam.  This recipe is suited for a single load in a standard iSi canister.
soak the gelatin


You will need:

750ml / 3C          egg nog
80ml / 1/3C         dark or spiced rum
3 sheets               gelatin


melt the gelatin with rum


Method:

 - soak the gelatin, then drain
 - gently warm up the egg nog in the microwave (just so the gelatin doesn't seize) 
 - heat the rum up in the microwave to fairly hot
 - melt the gelatin into the rum
 - mix the rum and the egg nog
 - load into the iSi gun
 - screw the top on and give it two NO2 charges, shaking well after each one
 - chill completely - at least a few hours or even overnight
mix with egg nog
 - shake well and serve


egg nog cappuccino!
charge and chill


Saturday, November 17, 2012

Recipe: Peeled tomatoes

Most people know the basic way to peel a tomato - blanch the tomatoes in boiling water for 30 seconds, then transfer to ice water, then peel.  It works, no doubt, but somewhere along the line, somebody took the time to really think about the process and what you are trying to achieve, and adjusted the technique accordingly.  

 In the industry, we go through a lot of tomato concasse - basically skinless dice tomatoes.   Ideally, it's a raw product, and by adjusting the way we do it, means that the flesh of the tomato doesn't even get that 30 seconds of cooking from the usual way.  The two biggest changes are to ice the tomatoes first, then break that 30 seconds down to 3 or 4 stages.  Incidentally, if you are going to stew the tomatoes anyway, you can keep blanching tomatoes as normal, this method is trying to keep them as raw as possible.

You will need:

tomatoes
a large pot of boiling water (you don't want the boiling to stop as you add the tomatoes)
two ice baths (lots of ice)

Method:

 - as normal, score the bottom of the tomatoes with an "X"
 - plunge the tomatoes in the first ice bath for five minutes
 - get the water really boiling
 - drop the tomatoes into the boiling water, but stop adding if the boiling slows down
 - after 5 -10 seconds, pull the tomatoes out and plunge into the second ice bath
 - repeat with the tomatoes that were left behind
 - switch positions of the ice baths
 - repeat the blanching 3 or 4 times, but the tomatoes won't need more than a total of 30 seconds cooking
 - after the last blanch, leave the tomatoes in the ice bath a few minutes - this will help loosen the skin
 - peel the tomatoes as normal

Friday, November 16, 2012

Recipe: Turkey jus

I love a good gravy, but if you want to elevate a holiday meal a bit you may want to try serving a delicious and refined turkey jus instead.  The major difference between a jus and a gravy is that a jus is not thickened with a roux, rather is is thickened through the reduction and concentration of a stock.  A jus will be a bit thinner than a gravy, but very rich.  If it is a concern for you, it is also nearly fat free and quite nutritious for you as you've taken a large amount of stock with all its nutrients and removed a significant portion of water. 

This recipe is an extension of the recipe for turkey stock in the previous post, so you can even start to prepare the wine reduction simultaneously as the stock is cooking.  Keep in mind that it is easier to take the fat out of a stock when it is cold, but it can still be done when warm with some careful ladling.  You don't need to start with a chilled product at this stage so if you need, you can go straight from straining the stock to the reduction of the stock to a sauce.  It's not an exact science or anything, so how far you take it down is up to you - you can have it thin like an au jus, or bring it right down to a syrupy consistency.  Depending how much sauce you need for the meal, it wouldn't hurt to have a bit of good chicken stock on hand to help stretch the final product if you intend to reduce the sauce quite a bit.  It's not really going to dilute the product too much as they are both birds and the flavour of the turkey stock will naturally override the chicken flavour.

How much do you reduce the stock?  Remember that you will serve it warm, so you can monitor the consistency as you go.  A good test is to spoon a little on a plate and watch how it behaves.  It should not run like water, but be able to hold itself in a clean little pool - it should also have left a nice even film on the spoon.

In the end, the quality of the jus will largely depend on two factors.  The first being the care taken in making the initial stock, and during the reduction process - wash your mirepoix, take care in skimming it, and never boil it - just let it gently simmer away.  The other factor is the level of refinement in the straining process.  Strain the initial stock well, but when straining the finished jus, go the extra mile.  You can start by straining through a rough mesh seive to take out the vegetables, but then you want to move on to a fine chinois, then to a cheesecloth lined chinois and even repeat that stage - you'll be surprised how much fine sediment keeps coming out, but in the end, your sauce will shine and be as smooth as glass.  

Final note, although I put a touch of salt in the initial stock to help the clarity, save all the seasoning to the very end.  In the reduction process, water is evaporated out, salt is not, and if you added it too early, your only option is to dilute the sauce to even things out.

You will need:

3                 onions
454g / 1lb   button mushrooms
2                 shallots
1L / 1qt      white wine
as needed   vegetable oil

Method:

 - julienne the onions and shallots
 - wash the mushrooms well and slice thin
 - with the smallest amount of oil possible, sweat off the onions and shallots (use a non-stick pan even)
 - add the mushrooms and sweat down
 - after the mushrooms have released their water and it has reduced out, add the wine
 - let the mixture simmer (not boil) and reduce until there is only a small amount of liquid left
 - add the mixture to your stock
 - simmer and reduce the stock to a jus - the thickness is up to you
 - strain well, really well
 - season
 - serve, or cool down and store in the fridge

Recipe: Roasted turkey stock

As you move through turkeys during the season, you should take the opportunity to make stock. Even if you have the carcass after roasting and eating the bird, there's still lots of flavour to be had in the bones.  Certainly, if you have decided to prepare the turkey off the bone, you won't want to waste the bones - you still need a sauce or gravy, and you won't have the roasting pan the day of the meal to get your juices.  

This recipe is a "brown" stock in that the bones and mirepoix have been roasted.  This will give you some much needed roasted flavour and colour for your sauce.  Of course you can keep this a "white" stock if you choose and not roast the bones and mirepoix (you'll want to leave out the carrot as well). 

Committed to a traditional gravy?  No problem, I love it too.  You'll notice I mentioned to keep the fat cap on the stock.  This not only ensures that you get every last drop the stock you made, you can use the fat cap to make gravy the normal way - make your roux, add the juice (stock), season and you're done.  You can even keep a stash of fat and stock in the freezer just in case at a later date you need to make poutine - you'll be a hero.

You will need:

4.5kg / 10lbs   turkey bones (any skin is good too)
3                      onions
4 stalks            celery
1                      carrot
1 bulb              fennel
4 cloves           garlic
pinch               kosher salt  

sachet:             tarragon
                        thyme
                        sage
                        bay leaf
                        black peppercorns

Method:

 - set the oven to 375F / 190C
 - set the turkey bones and skin on a tray and roast until golden brown
 - chop the mirepoix
 - set the mirepoix on the tray the bones were roasted in and toss around in the fat
 - roast the mirepoix to get a bit of colour
 - place the roasted bones and skin in a stock pot and cover with cold water
 - bring up to a gentle simmer
 - skim any impurities from the surface
 - when the impurities aren't surfacing much anymore, add the mirepoix and a pinch of salt
 - prepare the sachet and add to the stock
 - gently simmer 6 - 8 hours, skimming impurities when needed
 - turn off the heat
 - strain the stock through a cheesecloth lined seive (don't worry about fat getting through)
 - cool completely in an ice bath, then move to the fridge
 - once cold, you can remove the fat cap and use it if making gravy
 - use the stock as needed

Wednesday, November 14, 2012

Product review: Activa RM - "meat glue"

Activa RM has become a favorite in modern kitchens everywhere.  It is relatively "new" to the restaurant world, but has been used by commercial food producers for a long time.  Those deli-style turkey loafs and boneless honey hams you've eaten for years?  You bet, you've already had it.

For the sake of education, Activa is a transglutaminase, which means it is an enzyme that bonds proteins together.  It is generally produced through a special fermentation process or extracted from animal blood.  It may sound a bit scary, but on the good side, the scarier something is, the more closely the health authorities tend to scrutinize the operations.  Case in point:  people tend to be paranoid about undercooked pork, they have been for centurites, and for good reason as is a source of trichonosis.  These days, the pork industry is so closely watched that you can quite safely and confidently eat a medium rare chop if you choose - I've done it myself.

Moving past the production process, Activa opens up a world of possibilities for the modern cook.  From simple applications such as helping a terrine hold together or using it as a binder in hamburger meat to all out Dr. Frankenstein in the kitchen.  We did a holiday turduckin one year and used Activa to help hold the turkey, duck and chicken together.  I've even seen it used with a salt-crusted roast - Activa was mixed with the egg white to help create a better salt shell.

There are some good handling practices you should employ with Activa to ensure safety and the effectiveness of the Activa itself.  When using, it is easiest to apply using a salt shaker for even application, and when done, best to vacuum seal the shaker in a bag and store it in the freezer.  Whatever isn't isn't in the shaker should always be sealed and stored in the freezer.  You should wear gloves when handling the product, but don't worry, it's not like crazy glue, it's just that we are made of protein ourselves and any on your hands will be wanting to bond.  For the same reason, some chefs take the extra precaution of also wearing goggles and a surgical or drywall mask to avoid inhaling any airborne product.  As with many things, use it properly and responsibly and you will be able to accomplish things you may have never thought possible.

You will have a very hard time finding Activa in a store, but you can order it through Amazon.  There are two sizes available.

If it's your first time using it, you will want the smaller size - CHECK IT OUT HERE.

If you know you will be using it a lot, the larger size is HERE.

Tuesday, November 13, 2012

Recipe: Calabaza en tacha - candied pumpkin

Candied pumpkin always manages to turn up somewhere among our Mexican friends every fall.  Carla and I have on occasion purposely waited until the last possible moment to carve our jack 'o' lantern at halloween just so we can turn around and morning of November 1st, cut the sucker up and make candy (any extra got cooked down and pureed for pie) - hey, in Vancouver leaving the pumpkin outside for one night in the fall is just like putting it in the fridge (as long as it didn't get blown up).  As the dish's origins surround the Dia de Muertos celebrations, the timing is perfect.

The pumpkin is cooked in a syrup made from the piloncillo, but we also throw in some cinnamon, orange and guavas for flavour.  At first, it's a bit surprising how little syrup is needed, but the pumpkin releases a lot of water during the cooking.  Since the size of the pumpkin will always vary, it will get easier with time figuring out how much syrup is appropriate for each batch (Carla's grandmother gets fantastic results every time and even cooks it while she sleeps).  

The pieces of pumpkin are generally served with the syrup (and orange and guavas), so you want to have a nice consistency flavour to it at the end.  It is a syrup after all, so ideally, you have a nice viscosity without a sweetness level that will make your teeth fall out.  If you find that your syrup is a bit low during the cooking, you can either add a little more water, or turn the pieces to make sure the syrup gets absorbed evenly.  If you have a little too much syrup, you can always remove the pumpkin once it's done, then bring the syrup back down, then pour it over the pieces in the container you'll be storing it in if not eating right away.  

As for the latest batch we made, we found it easiest to give the guavas and orange a cook in the syrup first, then took them out before adding the pumpkin.  This way, the fruit flavours got in the syrup for the pumpkin to absorb, but we didn't have to worry about trying to mix everything up during the process, and we had a little more control over how much they got cooked.  Of course they were returned to the mix at the end.

You will need:

1                     small to medium pumpkin
2                     piloncillos (227g / 8oz each)
1                     orange
6                     guavas
2-3                  cinnamon sticks
125ml / 1/2C  water

Method:

 - start by dissolving the piloncillos in the water with the cinnamon sticks
 - slice the orange and cut the guavas into wedges and add to the syrup
 - simmer the orange and guavas in the syrup about 15 minutes, then remove and set aside
 - cut the pumpkin open, remove the seeds, and cut into pieces
 - arrange the pumpkin pieces in the pan, making sure each piece has some flesh in contact with the syrup
 - slowly simmer the pumpkin until you see it has released the water into the syrup
 - if necessary, turn the pieces to immerse the other side in the syrup
 - cook slowly until the pumpkin has taken the dark colour of the syrup and is very tender
 - return the orange and guavas to the pan and tuck them back into the syrup amongst the pumpkin
 - serve the pumpkin along with the fruit with a bit of the syrup (some like a little milk on top too)


Monday, November 12, 2012

Recipe: Vegetable "paper" - truffle parsnip

bag it
I made this the other day on a bit of a whim.  I was trying to come up with a nice modern fall garnish.  Parsnips certainly fit the bill but it needed something extra and truffle is always a nice addition to parsnip.  I've made parsnip chips a lot of times, but I thought making a paper would be a bit more interesting as you can break it into shards.  A paper would also allow me to fully develop the flavour within the mix itself.  I considered using truffle salt, but in this case didn't want to stray from the clean visual with the black speckles.  Because I was using truffle oil, I strayed from the usual 5% egg white ratio to make sure I got a crisp result.  I also lowered the dehydration temperature as I noticed early on in the process that 140F / 60C could potentially caramelize the sugars in the parsnip more than I wanted.  The end result was a delicious and crisp product with a nice tan.  If some of the previous posts have inspired you to modernize a holiday meal with sous-vide turkey, this would be a great way to get some parsnip on the plate.

puree it


You will need:

500g / 17.6oz          parsnip (peeled and chopped)
60ml / 1/4C             truffle oil
60ml / 1/4C             cream
60g / 2.1oz              egg white
to taste                    kosher salt
as needed                water


Method:
spread it and dry it

 - peel and chop the parsnip
 - put the parsnip in a vacuum bag with the truffle oil and a pinch of salt and seal tight
 - steam or submerge the bag in boiling water until very soft (45 minutes)
 - empty the contents of the bag while still hot into a blender
 - add the cream and just enough water to get a rough puree
 - add the egg white and puree completely smooth
 - add any more seasoning to taste
 - spray a silicone mat with pan spray
flip it and dry it some more
 - spread the puree evenly over the mat - don't worry about slight ripples, they will dehydrate out
 - set a wood warmer or dehydrator to 130F / 54C
 - let the puree dry out several hours
 - when the puree is at the "leather" stage, flip it onto a sheet of paper and peel off the silicone mat
 - transfer the leather on the paper back onto the tray and return to the warmer to fully dehydrate
 - remove the paper and let it cool to room temperature and crisp up
 - break off shards and serve


Friday, November 9, 2012

Recipe: Sous-vide and smoked turkey breast

In the restaurant industry, holiday meals are cooked very differently than in a home setting.  It is impractical to roast a bunch of turkeys for a few hundred people,  there's simply too much room for error and it's too frantic at service time to be carving varied cuts from the birds.  The most efficient way to do it is to separate all the parts of the meal, cook each one perfectly, then bring them all together on the plate.  This means that white and dark meat are cooked separately and off the bone (the bones are used to make turkey stock which is then turned into gravy) and stuffing and vegetables are all cooked separately and perfectly on their own too.  While the traditional ceremony of carving the turkey still holds strong in most homes, some people are starting to take more of an industry approach to the holiday dinner in the pursuit of each dish being the best it can.  With proper organization, it also means that the cook can at least socialize a little bit as things get ready.

This is a fantastic way to cook the breast portion of the meal.  If you like turkey sandwiches throughout the year, this is definitely the way to go as the meat cuts beautifully cold and is just as juicy as fresh roasted.  Use the brine recipe from the previous post as preparation.  I've also included a smoking stage in this method - if you have the capability, it adds a bit of that "roasty" character many people would be worried about losing by straying from the traditional method.  If you don't, it's ok, the meat is still fantastic.

If you still want to have the roasted skin effect, one way to do it is to leave the skin on throughout the sous-vide process, but shorten the time (an hour would be ok), then heat the breast up for the meal in a hot oven skin side up (and patted dry, then basted with some fat).  Make sure to check the temperature in the middle of the breast to ensure it is fully cooked (165F / 74C).

If you are from the South and like to deep fry your turkey, follow the same procedure as the roasting finish, just use the deep fryer.  Again, you only need to warm it through and finish off the cooking.

You will need:

as needed           turkey breasts
as needed           turkey brine

Method:

 - clean up the breasts nicely and prepare your brine
 - brine the breasts (48 hours if using the one in the previous post)
 - rinse the breasts well under cold water and pat dry
 - cold smoke for 1-2 hours, depending how much you like to smoke
 - seal in a vacuum bag (don't squish them together in the bag, give them breathing room)
 - set the circulator to 76C / 168.8F
 - submerge in the bath and cook for 2 1/2 hours (less if you plan to finish by roasting)
 - remove from the bath - if not serving right away, plunge into an ice bath to cool
 - open the bag, put the breasts on a rack to let the extra surface juices drain away (save them as stock)
 - carve slices and serve

Thursday, November 8, 2012

Recipe: Turkey brine

With the holiday season upon us, there are a lot of turkeys destined for tables everywhere.  One method of getting the turkey ready for cooking is to brine it.  It helps get some flavour into the meat the same way a marinade does, but more importantly, it helps the bird retain a lot more moisture within the meat once cooked.  Hate dry turkey?  This is one of the best defenses.  This recipe starts with 4 litres (1 gallon) of water - test by placing the bird in your brining container, then pouring the water over it.  If the bird isn't covered, you will need to multiply the recipe.  For efficiency, you want your brining container to be close to the size of the bird with room to allow brine to freely circulate around - no squeezing it in against the sides.  In our family, we bought a new plastic garbage pail, and it has and only will ever be used for brining.  And yes, this recipe will work nicely with other poultry as well.

You will need:

4L / 1gal               water
220g / 7.8oz          kosher salt
80g / 2.8oz            sugar
25g / 0.9oz            black peppercorns
small handful        fresh thyme
2                            oranges

Method:

 - place the water, sugar, salt and peppercorns in a pot on the stove 
 - bring to a simmer until the salt and sugar have dissolved
 - turn off the heat and add the thyme 
 - peel the oranges, then segment the flesh (we just don't want the bitter white pith)
 - add the orange to the brine
 - allow the brine to cool completely
 - if the bird came tied up in any way, untie it and remove any of the goodies inside you don't plan to roast
 - place the bird in the brining container and cover with the brine
 - brine in the fridge (or garage if it's cold enough outside) for 48 hours
 - remove the bird from the brine
 - rinse the bird under cold water - this removes any excess salty brine
 - pat dry
 - you won't need any more salt, but anything other surface seasonings are up to you
 - roast as you would normally

Wednesday, November 7, 2012

Recipe: Dulce de leche

Dulce de leche is often confused with caramel sauce, but more accurately, it is caramelized condensed milk.  The process of making it was actually quite a big hurdle for me to get past as it involves cooking the milk within the sealed can.  Being a good Canadian kid who's done a bit of camping, the thought of heat applied to a sealed vessel brings to mind images of exploding cans of beans and giant fireballs (don't ask).  The potential for a hot caramel explosion in the kitchen was pretty frightening - there's no trees to hide behind.  The reason this doesn't end in disaster is that the can is submerged in water throughout the process.  There is still an element of danger if you aren't careful however - I heard a story of an apprentice allowing the water to burn off, thereby resulting in the painting of the ceiling with dulce de leche.  Nobody was hurt, but he spent the rest of the night cleaning up the mess.  In addition, UNDER NO CIRCUMSTANCES do you open the can while it is hot.  Always let it cool completely.  The best approach is to make this a day before you need it and have it in the fridge as an extra measure of caution.

You will need:

1 can              condensed milk

Method:

 - put the can in a pot and cover it with water
 - gently bring the water to a simmer over low-medium heat
 - allow to simmer for about 4 1/2 hours
 - if you notice the water level start to move down the can, boil a bit of water to top it up with
 - after 4 1/2 hours, turn off the heat and use tongs to transfer the can to a hot mat to cool
 - once it has cooled to room temperature, move the can to the fridge to cool completely
 - use as needed

Tuesday, November 6, 2012

Recipe: Rompope (egg nog liqueur)

Rompope is a delicious egg nog like liqueur you can find all over Mexico and a few other Latin American countries.  Official history has that the Spanish brought it over in the colonial days and it was often produced in convents, particularly in the area around Puebla.  Mexicans have since ran with the idea and while some convents still produce it, a lot of people choose to make it at home.  Not too long ago, Carla and I were in Cholula (in the province of Puebla) and visited a distributor for Santa Ines Rompope.  The variety of flavours available was amazing, from vanilla to peacan, and even berries and other fruits.  Duty-free restrictions limited what we could bring back, but we made sure to diligently sample them all.  

I came across a recipe a while back and got around to making it this week.  Since it needs a few weeks to ripen, it will be ready for the Christmas season.  Honestly, it is pretty tasty already, so I think if you needed it in a hurry, a couple days would be ok, but I'll hold out and give it its due time just to see the full potential.  I still love my egg nog, but after a big meal, a few sips of rompope will be pretty satisfying without the heaviness.  This recipe makes just under a litre (quart), so it's a good size to start with.
huevos!


You will need:

250ml / 1C              sugar
125ml / 1/2C           water
4                              egg yolks
177ml / 6fl oz          evaporated milk
207ml / 7fl oz          condensed milk
10ml / 2tsp              vanilla paste
187ml / 3/4C           white rum
add the milks rum and vanilla


Method:

 - put the sugar and water in a pot and bring to a simmer to dissolve the sugar - set aside to cool 
 - separate the egg yolks and give them a light whisk
 - add the evaporated and condensed milks and whisk
 - add the vanilla and rum
 - slowly pour the syrup into the mix while whisking
 - strain the mix to take out any of the egg solids
 - pour into a mason jar or bottle and store in the fridge
 - let ripen about 3 weeks
whisk in the syrup
 - start sippin' chilled and garnished with a little grated cinnamon or nutmeg


now we wait


Monday, November 5, 2012

Cookbook review: Mugaritz: A Natural Science of Cooking, by Andoni Luis Aduriz

Mugaritz: A Natural Science of CookingThis is one cerebral cookbook.  Despite spending a couple seasons on the creative team at El Bulli, it wasn't a cinch for Chef Andoni Luis Aduriz to take his restaurant Mugaritz from foundation to being one of the top restaurants in the world.  Where others might want to play up any connection to a chef like Ferran Adria, Chef Aduriz wanted to set his restaurant apart from what he saw emerging as the "molecular" scientific approach to the dining experience.  He wasn't looking to ignore the value in the knowledge of such cuisine, rather he was looking to naturalize it a bit and bring it back to earth.

When you look at the pictures in this book, they are beautifully simple, but then look at the corresponding recipe and you can see the thought that went into the dish.  You can be sure that the "spice rack" at Mugaritz is as out of this world as any of the "molecular" restaurants, it's just a bit more subtle as to how it hits the plate.  Eating rocks and "petrified" wood is definitely not going to strike you as normal, but Chef Aduriz makes it seem as natural as a mixed green salad.  Where other chefs are deconstructing dishes, Mugaritz has been deconstructing the whole thought process behind the creation of a dish.  I find some of the more interesting essays are those that discuss how they have actively worked with their suppliers.  In some cases, they have managed to get the farmers to tailor their crops to the restaurants specific needs and desires.  In other cases, the farmers have had to educate them on the limitations of particular crops.  How many chefs when confronted with inconsistent results with their foie gras would not simply return it to the supplier, but actually do some legwork to help their supplier achieve better results?

I've always been enthusiastic about the potential that food science has brought to the culinary industry, but always felt a certain measure of restraint and a sense of appropriateness are needed to avoid "molecular cuisine" coming off as a gimmick.  Chef Aduriz and his team are doing just that.  Don't worry so much about whether or not you have all the ingredients to pull off all the recipes here, the important thing to take away is the approach to the food.  CHECK IT OUT HERE.

Sunday, November 4, 2012

Recipe: Soft-set chocolate praline pot de cremes

This is a delicious chocolate item with multiple applications.  It can be garnished and served as a dessert on its own, or it can be used as a single element on a larger dish.  An espresso cup of this is a perfect complement to a plate of cookies or biscotti.  If you are arranging a platter of pastries, use this mixture to fill mini tart shells or chocolate cups.  You can even spread this on a plate as a plate garnish.  There is no gelatin in the recipe, so it is easier to make a batch and work with it at a later point, but if you are filling a cup or a tart, you will get a cleaner finish if you do your filling while the mix is still warm.  The praline paste you want to track down should have the consistency of smooth peanut butter.  You may have to go to a specialty shop, failing that, see if you can negotiate a deal with a local pastry shop - they most likely will have some on hand.

You will need:

400ml / 13.5fl oz        cream
375g / 13.2oz             milk chocolate
50g / 1.8oz                 praline paste
20g / 0.7oz                 glucose

Method:

 - chop the chocolate up small and place it in a bowl
 - measure out the praline paste and add it to the chocolate
 - put the cream and glucose in a small pot and bring to a simmer
 - pour the sweetened cream over the chocolate and praline
 - stir with a spatula until you have a smooth ganache
 - fill your cups or tarts, or store for later use
 - keep refrigerated until serving

Saturday, November 3, 2012

Recipe: Honey rye sourdough bread

This is a nice sourdough to get started with using your starter.  You will need to have a little dark rye flour on hand, and it's always best to use bread flour if possible as the added gluten will help hold the shape as the yeast expands.  As with using a sour starter which will have a variable moisture content, you may need to adjust the flour to get the texture right - keep a little flour aside during the initial mixing, then add enough it to the dough to bring it together.  Depending on your style, this recipe will make one large or two smaller loaves.

You will need:

440g            bread flour
60g              rye flour
150g            sour starter
20g              honey
10g              fresh yeast
250ml          warm water (not hot)
10g              kosher salt

Method:

 - if using a dry yeast, bloom it in the warm water
 - weigh out all ingredients
 - keep aside a little flour, add everything else into a mixing bowl and mix with a dough hook
 - if necessary, add some flour to "dry" it out a little
 - when you have a good smooth and firm ball of dough that doesn't stick to the bowl, move to the counter
 - knead the dough a little, round it up and place it in a bowl
 - cover the bowl with plastic wrap and let it proof to double its size
 - punch it down, shape the loaf and place it on a paper lined baking tray
 - cover and let it proof again
 - preheat the oven to 365F / 185C
 - when the bread has doubled in size, make a few cuts along the top
 - bake for about 20 minutes
 - check the bread by knocking it, if it sounds hollow remove, if not give it a little more time
 - cool on a rack
 - serve

Thursday, November 1, 2012

Recipe: Potato and caramelized onion sourdough starter

Sourdough can be a real passion.  It's your friend in the fridge that grows and develops a personality over time - sad and starving if you neglect it, happy and fluffy if it's fed when hungry, it may try to escape if you feed it and don't tame it by taking some out.  I'll always try a sourdough if offered a selection of breads because regardless of recipe each individual starter has its own particular character and I'd hate to miss out on trying one.  If you find a bakery with a sourdough bread that just sings to you - remember them and patronize them because nobody else in town will ever have the same flavour (even theirs will evolve with time).  Other bakeries may be just as good, but never the same.  One day, when I get to San Francisco for a reason other than changing planes, I'm searching out one of the bakeries with a starter over 100 years old.  I even wonder sometimes if a starter can be insured - if a bakery burns down, sometimes the starter may be one of the greatest losses.

While making a starter is relatively easy, the commitment to bread production is the larger task at hand.  What if you go on vacation?  You may trust your neighbour to feed the cat, but will they feed the starter?  For this reason, commercial operations are usually where you'll find starters, but if you make a lot of bread at home already, by all means you should have one on hand.  This recipe is relatively basic, but the potential variations are endless and you can develop your own according to your taste.  

Developing and maintaining your starter's particular character is eventually a product of the feeding process - be regular and consistent with the formula you choose.  You can change things up by changing the feeding flour, just remember there will be a gradual transition as consistency re-sets itself.  I used to use a really good rye starter, but over time the regular additions of rye flour really darkened the product up, so we'd periodically give it a meal of white flour just to lighten it and keep it a bit more versatile (we used it for more than just rye sourdough).  Certain infusions can help give your starter a nice flavour too (herbs or aromatic vegetables such as fennel), just remember to take anything you added out after a couple days - you don't want it decaying on you, and it gets frustrating dealing with random bits floating around the starter. 

Feeding the starter.  It's possible to wing it, but consistency is always a better idea.  A good idea is to weigh the bucket or whatever vessel your starter will call home, then write the weight down - even right on the bucket.  Assuming you keep your starter in the fridge, once a week, when it's time to feed, weigh the bucket, starter and all, then subtract the weight of the bucket itself.  Calculate 1/3 of the weight.  For that 1/3 weight, measure out 60% flour and 40% filtered water (chlorinated tap water is best avoided if possible).  Add the flour and water to the starter and stir vigorously before returning to the fridge.  If you have something like a rye starter, you will want to work out a ratio of rye flour to bread flour for your flour portion.  If you don't have filtered water, leave tap water out for a day or so to let the chlorine dissipate.

If your starter gets a bit large to handle, move it along.  Give it to friends, make more bread (even pancakes), or you can store it as insurance in case something happens to the main starter.  One way is to feed the starter, then freeze it in an airtight container.  This way, the starter has some food to eat as it thaws out.  The other way is to feed the starter, then spread it out on paper lined sheet pans and let it dry in the open air for a couple days.  Then you can break it up and store it in an airtight container in the pantry.  When bringing it back, just rehydrate it with a little filtered water.

You will need:

500ml / 2C           whole wheat or rye flour (you can switch to bread flour once the starter is alive)
500ml / 2C           filtered or bottled water
1-2                        potatoes
1                          white onion

Method:

 - peel and chop the potatoes
 - cover the potatoes and cook soft over low heat
 - strain the potatoes out and let the water cool
 - cut the onion in half and char the cut sides in a fry pan
 - mix the flour and the water with a whisk
 - submerge the onion
 - cover the starter with a loose lid or cheesecloth (it needs to breathe) and keep at room temperature
 - after a day or so (depending on your climate), the starter should look foamy and smell like sourdough
 - cover the starter with a tight fitting lid and store in the fridge
 - remove the onion after a couple days
 - use as needed and feed accordingly